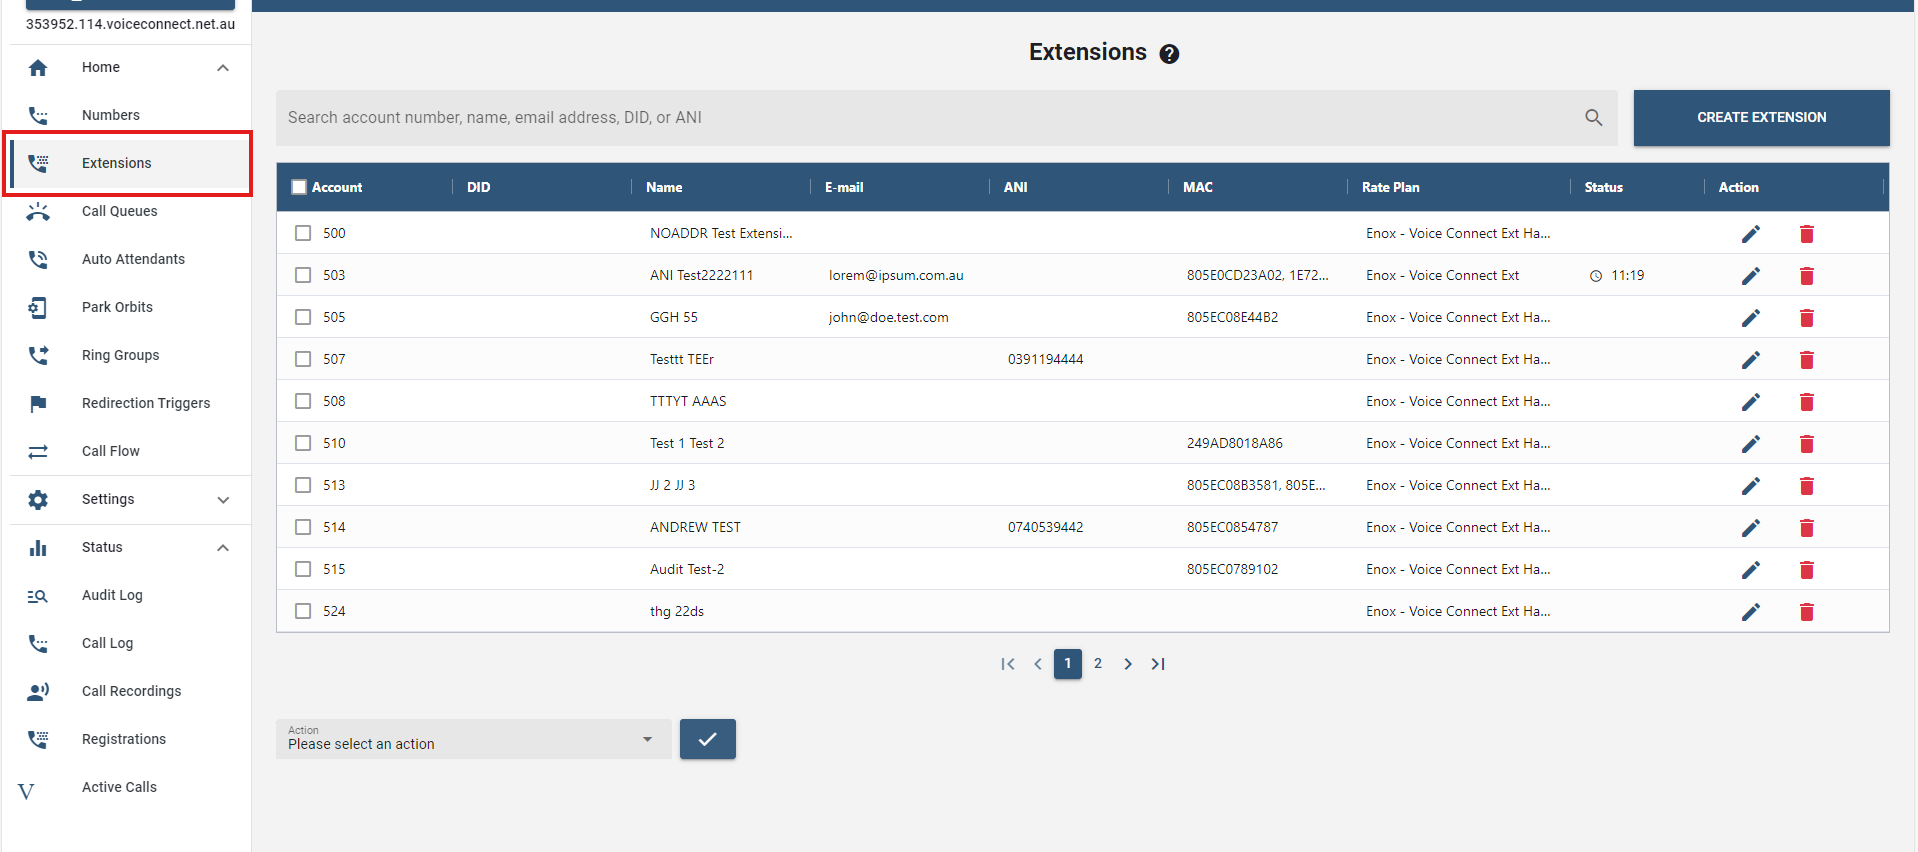
# Extensions
Extensions are essentially the phone numbers allocated to the phones connected to the PBX, which are the extensions of the PBX. That is how one phone of the PBX can call another and how external calls can be directed to a particular extension etc. Extensions have a wide selection of settings.
# Creating New Extensions
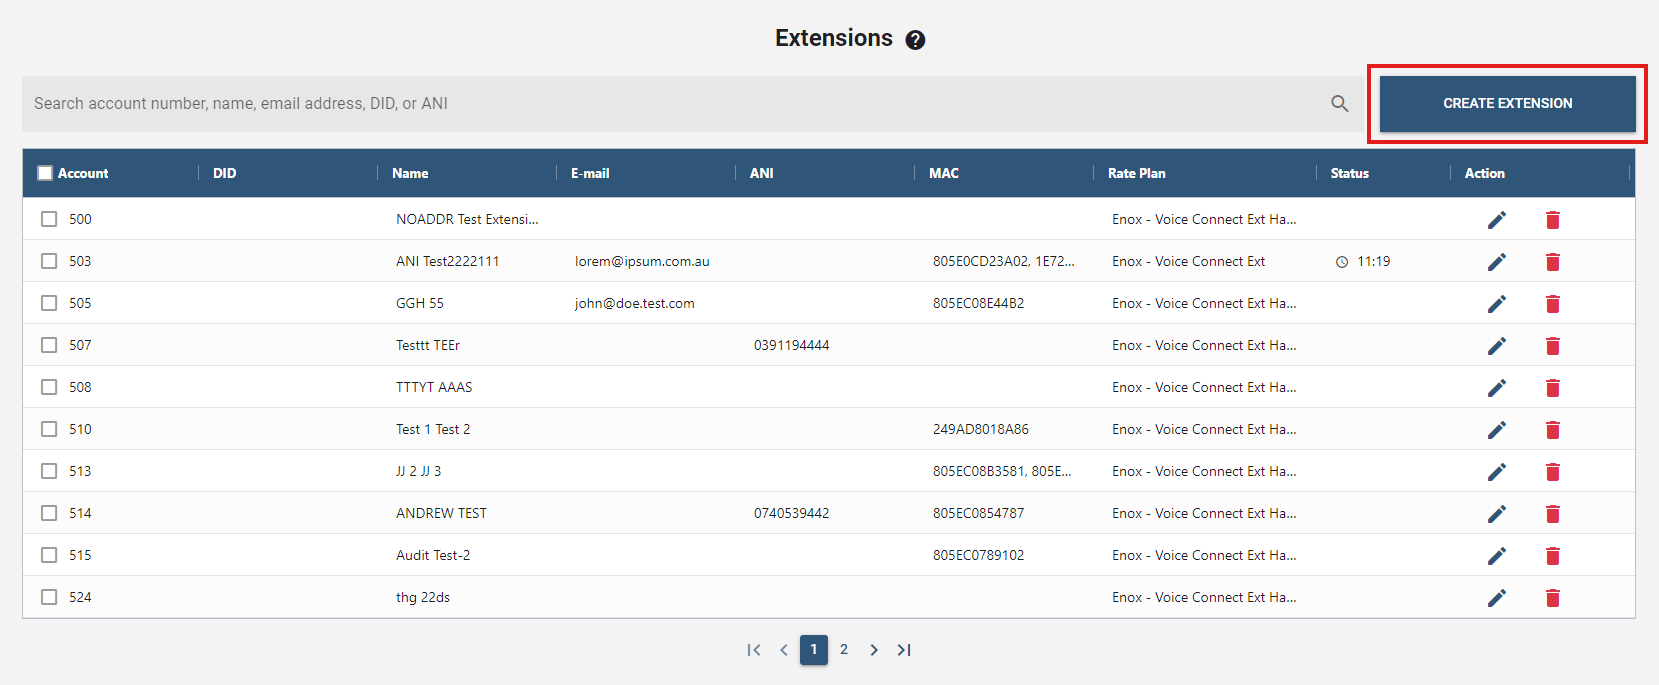
The Link telephone system comes with some default pre-configured extensions. But of course, creating new ones is obtainable.
- To create a new extension, click the button .
- Populate the fields for each of the extensions, using the information shown below:
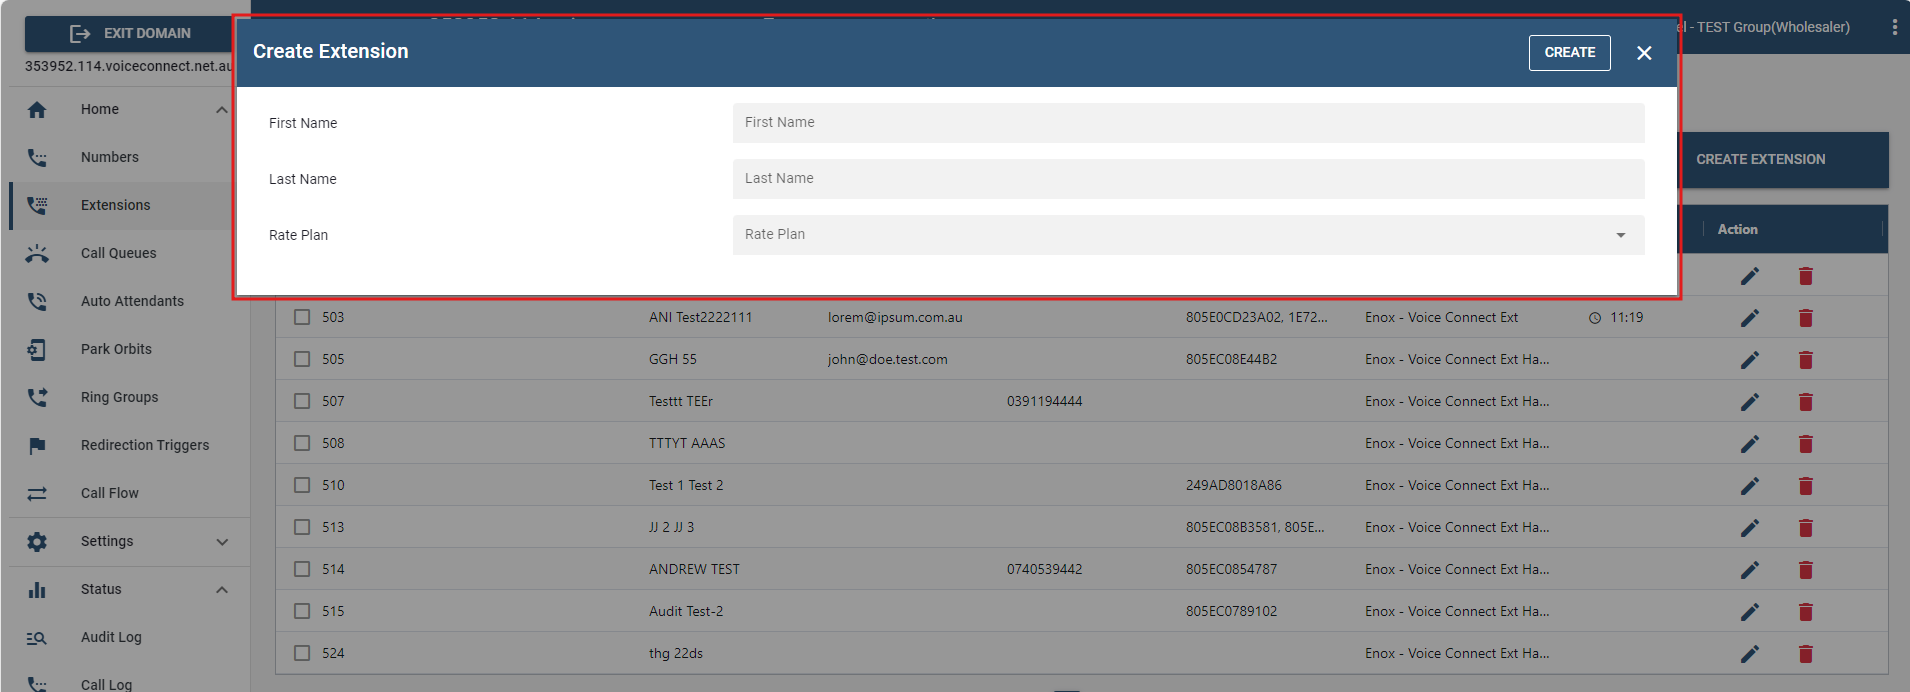 - First Name, Last Name: The First name and Last name fields will be displayed for all internal and external calls (international characters are permitted). - Rate Plan: A rate plan is tied down to a specific extension. Rate plan options are available on the dropdown list.
 - Once done, press . The extension(s) created will be shown in the "extensions' list".
# Configuring an Extension
- Select an account from the extension list and click the "edit icon" to configure.
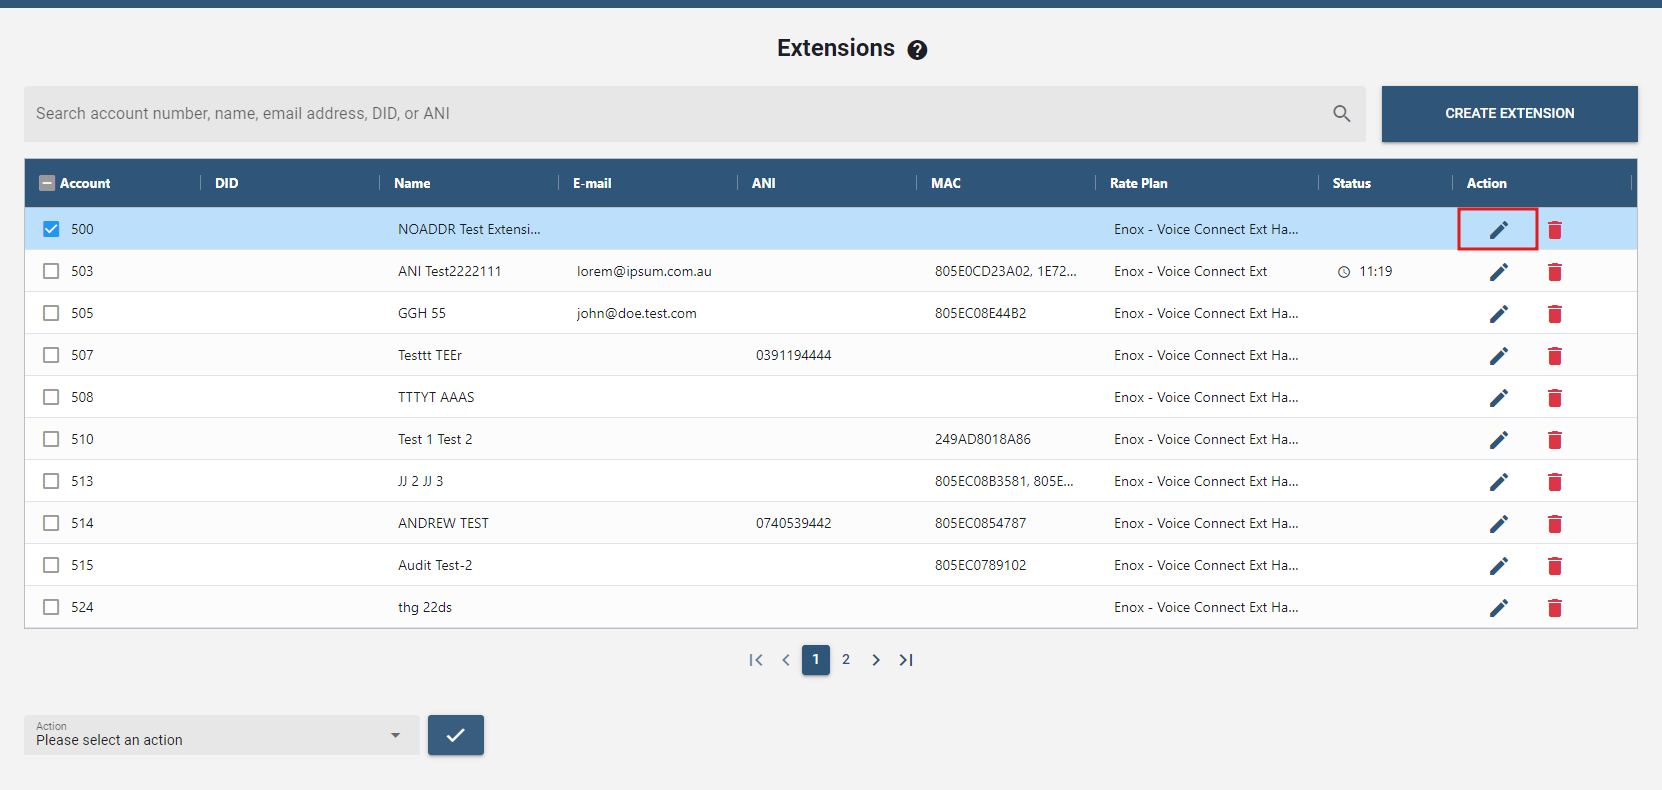
- Following that, a new window will pop-up to configure the details. There are many settings divided into tabs:
# GENERAL
The first tab is General which has all the general settings of the extension.
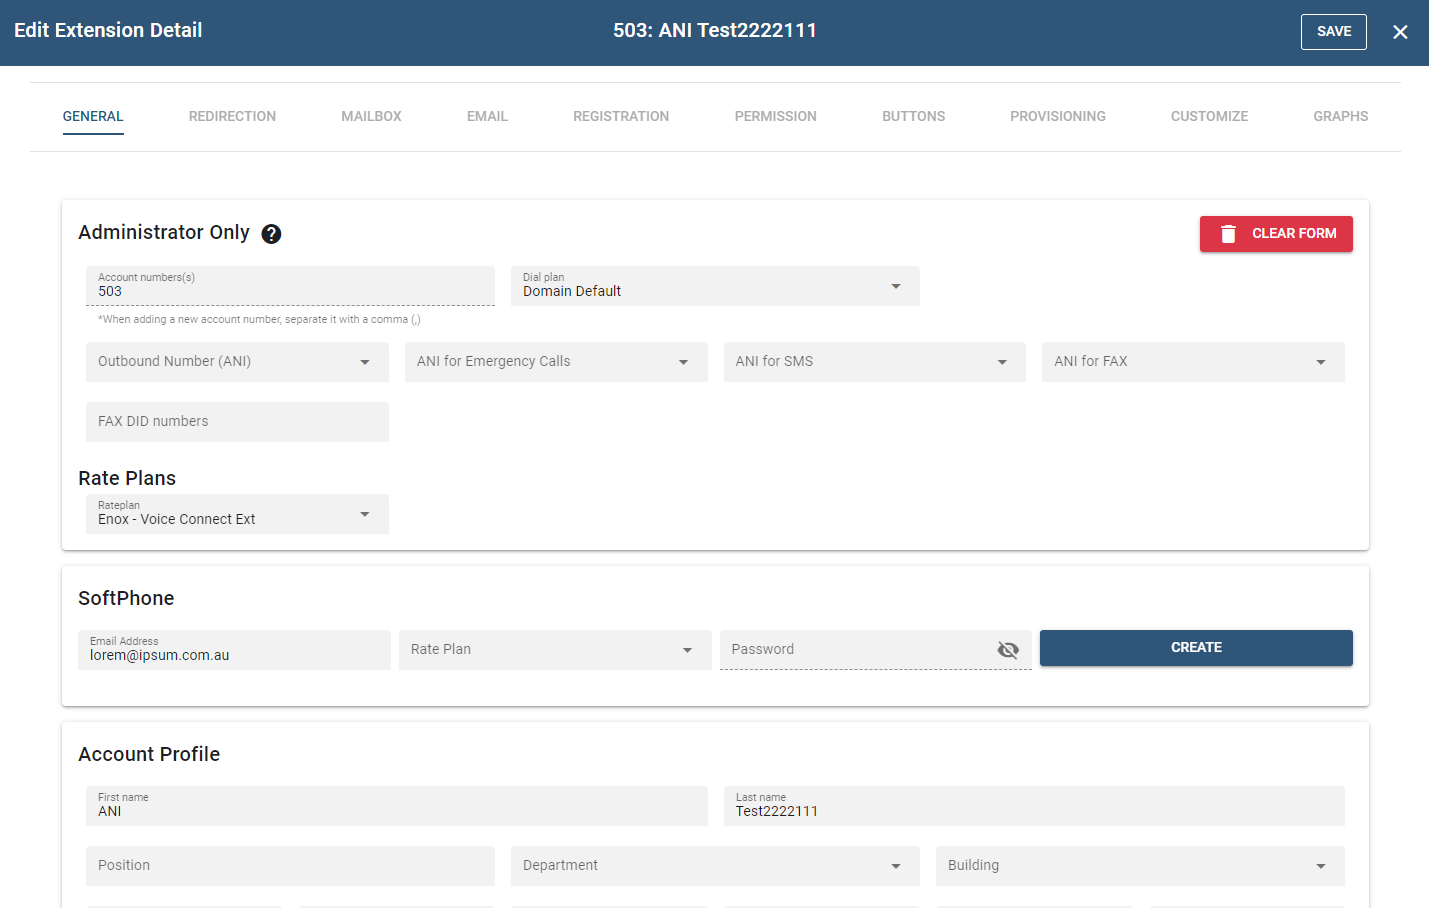
# Administration only
- Account Number(s): This will be generated upon creating an extension. When adding a new account number, separate it with a comma (,).
- Dial plan: Dial plans determine which trunks are used for outbound calls. Dial plans that are available in the tenant show up in this dial plan dropdown.
- Outbound Number (ANI): ANI (Automatic Number Identification) is a service that tells the recipient of a telephone call which telephone number made the call.
- ANI for emergency calls: When this field is populated, this ANI will serve as the callback number when an emergency number has been dialed. The Emergency ANI will now be shown, enclosed in parenthesis when displaying the "All Accounts" list.
- ANI for SMS.
- ANI for FAX.
- FAX DID numbers: In this setting, numbers that should be routed directly to the mailbox can be entered as FAX calls. Those numbers must be in the list of account numbers.
# Rate Plans
- Rate Plan: A rate plan is tied down to a specific extension. Options are available on the dropdown list.
# Soft Phone
# Account Profile
- First name and Last name: These fields will be displayed for all internal and external calls (international characters are permitted).
- Position: This field is for the user's position/job function in the company.
- Company name: This field is reserved for the company name.
- SIP Password: The SIP password influences the connection between the VoIP phone and the system. Users should not change this password, as it will interfere with access to other registered SIP devices (e.g., soft phone).
- Web Password: This password is used to access the Vodia PBX web interface. Note: Use a combination of letters and digits and even a symbol to ensure password security. After you've entered a new password, the current HTTP session will stay valid until your next login. Permanent cookies will be invalidated on the next login.
- PIN: The user's PIN will be used in several areas of the system (e.g., when accessing their voicemail from an outside phone, when using the calling card account, and when hot desking). For optimum security, users should be required to use at least five digits.
# Timezone
This setting tells the system the user's time zone. It will affect the time stamps of the mailbox and all other time stamps related to the extension. When using the extension from a time zone that differs from the domain's time zone, users will need to override the domain setting.
# Language
- IVR Language: This setting controls the language of voice prompts delivered by the system, as well as the language that is displayed on the LCD of the user's phone. (Callers will not hear the language when calling into the user's mailbox.)
- Web Language: This setting allows users to control the language of the Link web interface and in the emails they receive from the system. Users can override this setting during their initial login to the web interface.
# Picture
- Upload an image: The uploaded picture will be displayed whenever the user calls another extension within the same domain (as long as the other extension has picture-displaying capability). To facilitate easier picture upload during the call setup, users should use a thumbnail image size. The format of the picture depends on the phone model. For Snom 370 phones, use a grayscale BMP image. For models that can display color photos, use a JPEG image. The system will display the picture on the landing page of the Link web interface.
# Ring Tone
- Ring Group Melody - This setting allows you to set the ring melody so that group members will be able to distinguish regular calls from any group calls.
- From Header - This setting allows you to set the display name that ring group members will see when someone is calling.
# Monitoring and Call Pickup
- Explicitly specify pickup preference: This setting allows users to specify the accounts that will be picked up when they execute the Call Pickup (_ 87) feature. This setting is especially useful when extensions have been grouped with certain call queue and ring group, as it will prevent the wrong calls from being picked up. If a star ( _ ) is entered into this field, the system will have no preference list to draw from and will require a park orbit number after the *87.
- Explicitly specify park orbit preference: This setting allows users to specify a list of park orbits that can be used for parking calls. When park orbits have been entered into this field and the user executes the Call Park (_ 85) feature, the system chooses the first available orbit. When a star ( _) is entered into this field, the system will have no preference list to draw from, and the user will be required to enter the number of the park orbit after entering *85.
# Miscellaneous
- Block outgoing caller-ID: This setting allows the user to control whether their caller-ID is shown when making outbound calls.
- Enable Call Waiting: This setting allows the user to turn call waiting on and off.
- Wakeup time: This field allows users to receive automatic wakeup calls from the system. Though this feature is used primarily in hospitality environments, it can also be used on an individual basis. A wakeup call can also be activated using the star code *62.
# Address Book
- Phone address book preference: This setting allows users to upload contacts from the domain and personal address books to their phones.
- Include local extensions in the phone address book: This setting allows users to add extension numbers from the system to their phone.
# Music on Hold
This is the extension level music on hold feature which takes precedence over the one set on tenant level, given that various wav files are uploaded in the tenant to be used here.
# REDIRECTION
The next tab is Redirection which has all settings involving redirection of the extension like DND, call forwarding, cell phone inclusion etc.

# Call Forward
- Do not disturb: This setting allows users to tell the system to leave their phone silent for all calls, both internal and external, and even calls from the ring group. Only extensions with permission to override DND will be able to call the extension. DND override is an administrator setting. An extension on DND can place outbound calls at all times. You can also set DND using the *78 star code.
- Default Duration for DND: The DND status can automatically expire after some time. This is useful, for example, when someone puts the extension on DND for a lunch break and wants to make sure that it automatically turns off after the break. The following options are available:
- 1 min - 24 hours: These values set a fixed mount of time for DND.
- For the rest of the day: The duration depends on when the user turns DND on, so that the DND status expires at the end of the day.
- Default (No automatic reset): When this item is selected, the DND status will not automatically turn on and needs to be turned off manually by the user.
On the app, the user can decide how long the DND status will last. For other devices like VoIP phones, this is not possible. In these situations, the system will use the default duration for DND.
- Handling of suspected SPAM calls: This setting controls the treatment of incoming calls; however, it does not affect internal calls or calls from a ring group or call queue.
- Default: Uses the setting at tenant level.
- No special treatment: All calls are sent directly to the user's extension.
- Reject Call: The caller will be informed that the user does not accept anonymous calls and will not be put through to the extension.
- Send to mailbox.
- Pretend to be busy: This setting prevents the call from going through but does not tell the caller why.
- Ask for name: The caller is prompted for his or her name and then put on hold while the extension is called. After the system reads out the recorded name, the user can decide whether to accept the call, send it to the mailbox, or reject it.
- Ask for name even if caller-ID is valid: This setting requests the caller's name, even if the caller-ID is available. Only white-list callers will be put directly through.
- Threshold value for rejecting SPAM calls: This number between 0 and 100 determines when a call is considered SPAM in the context of calling the extension. If the value is not set, the value on the tenant or system level is used.
- SPAM score for anonymous callers: If there is no caller-ID available, the system will use the number in this setting. If the value is not set, the value on the tenant or system level is used.
- Hot Desking at: This setting allows users to specify an extension where they will pick up their calls. All calls (including calls from a call queue or ring group) will be sent to this extension.
- Disconnect call with busy when extension is busy: If this flag is enabled, the system will send a busy (SIP 486 Busy here) instead of connecting the call and playing a message. This works only if the call is not yet connected on SIP protocol level.
- Call forward all calls to: This setting allows users to redirect all calls to another extension. Only calls that are headed directly to the user's extension will be affected by this setting. If a user is part of a ring group, call queue, or paging group, calls originating from these groups will not be redirected. The calls that are getting forwarded can be filtered by internal or external calls. Also it is possible to select the times when the call is being forwarded.
- Call forward calls when busy to: This setting allows users to forward all calls to the extension that is specified, only when the extension is busy. This condition is true if either the phone itself signals that it is busy or if the lines parameter has been set for the extension and this number has been reached. If this setting contains the word "busy", the system will not redirect the setting but instead attempt to send a busy signal to the caller if the call is not already connected. The same conditions as the previous settings for forwarding are available.
- Call forward on no answer to: This setting allows users to redirect all calls after there has been no answer for a predefined period. The waiting period is defined in the tenant but can be overridden by the call forward no answer timeout setting (next bullet item). (If the mailbox picks up earlier, this setting will have no effect; if the call is redirected, the mailbox timeout will be cancelled.)
- Call forward on no answer timeout: This setting determines how long the system will wait for the user to answer the phone before forwarding the call. If the setting is not available, the system will use the tenant setting for this value. If that is also not available, the default is 30 seconds. This field is effective only if the call forward on no answer field has been set.
- Call forward when not registered: This setting allows the user to specify where calls will be forwarded if the user's extension is no longer registered for any reason. If the user is part of a ring group, call queue, or paging group, calls originating from these groups will not be redirected.
- Include following extensions when this extension is being called: Instead of using a ring group, the system can include other extensions when the extension receives a direct call. There are no stages, but this is a simple way of setting up pickup groups where each group member can pick up calls from another extension.
# Cell Phone Numbers
The settings for the cell phone allow you to configure one or more cell phones to your extension. Cell phone integration is different from having two phones registered to the same extension. Registering two phones to the same extension allows you to merely receive calls at one of two locations, while cell phone integration allows you to receive calls at any location, as well as be reached at numerous phone numbers. Cell phone configuration allows you to be accessible at all times, even in the event of a power failure. If the office extension (or remote extension) is disconnected from the system, calls will automatically be sent to your cell phone. Once the phone is reconnected, incoming calls will automatically be rerouted to the extension.
- Cell phone numbers: In this setting the user can put one or more cell phone numbers. If there is more than one number, spaces must be used to separate the numbers. While most users populate this field with a cell phone number, actually any phone number can be used (for example land line numbers). The numbers must be entered without any spaces or hyphens (e.g., 9781234567).
- Cell phone numbers (inbound only): The user may specify additional cell phone numbers that are used for detecting inbound calls from the user; however those numbers are not used for outbound calls. This is useful to simplify authentication for call from the users associated numbers without disturbing the user on those numbers when locating the user.
- Numbers that will never get to the cell phone: Because cell phones are usually carried as a personal item during the whole day, it is important to define who can call the cell phone and who cannot (as well as the times). This setting explicitly blocks certain numbers from calling the user's cell phone. The setting contains a list of numbers and wildcards, separated by space. For example, the list "400 5*" would block extension 400 and all extensions starting with 5 to call the cell phone.
- Numbers that will get to the cell phone anytime: Similar to the previous setting, this list defines the important contacts that can call the cell phone at any time, regardless of the time restrictions below.
- Offer special menu when call is answered on cell phone: This setting provides users with additional menu options when answering a call from the cell phone.
- When this cell phone calls the PBX: This setting defines what the system should do on incoming calls. It can either offer a personal virtual assistant or just apply the general rule for routing inbound calls.
- Initiate call back after hangup: To avoid charges to the calling cell phone, the PBX can automatically call back the cell phone after it called into the PBX. This feature is useful when employees have to pay privately for cell phone minutes. With this feature, those charges can be avoided.
- When calling the extension in a ring group: When a call hits a ring group, the PBX can include the cell phone in the group call. In this case there is no option to delay the call, however, the user can include the cell phone when the VoIP phone is not registered. This is a great option for hosted PBX when there is a risk that an office gets temporarily offline when cell phones can take over.
- When calling the extension in call queue: Similar to the previous setting, the cell phone can also be included in call queue calls.
- Include cell phone for web callback: When using the click to dial feature from the web browser, this setting controls if the cell phone should also be included in the callback. As with the settings before, the callback can be made depending on the registration of the VoIP phone.
- Specify time when system calls the cell phone: If the user wants to limit the cell phone inclusion to a certain time of day, he can specify this in this setting. If redirection triggers have been set up in the domain, they can be used for that purpose; otherwise, the user can just specify the times in the fields.
# Disable device types
When the system is going to call an extension, it can select which devices are getting called:
- Disable calling mobile phone numbers: This flag determines if the system is going to call a cell phone on a cell phone number (not the app).
- Disable calling the app: This setting disables calling the mobile apps. The desktop apps are called regardless.
- Disable calling VoIP phones: This setting determines if the system is calling a standard SIP registration, typically a desktop phone.
# Recording
- Record incoming calls to extension: This setting controls the recording on an extension (applies to calls coming from another extension for the entire tenant).
- Record outgoing calls to internal numbers: This setting controls the recording on an extension (applies to calls going to another extension for the entire tenant).
- Record outgoing calls to external numbers: This setting controls the recording on an extension (applies to calls going to external numbers for the entire tenant).
- Record outgoing calls to emergency numbers: This setting controls the recording on an extension (applies to calls going to an emergency number).
# MAILBOX
The next tab is Mailbox which has all the mailbox settings, including the interface for uploading the greeting wave files, and shows the voicemails of the extension.
Every extension has a voice mailbox on Link; however, the administrator can disable users' mailboxes and use an external mailbox, such as Microsoft Exchange. This section applies only to the voice mailbox of the system. This tab has all the mailbox settings, including the interface for uploading the greeting wave files, and shows the voicemails of the extension.
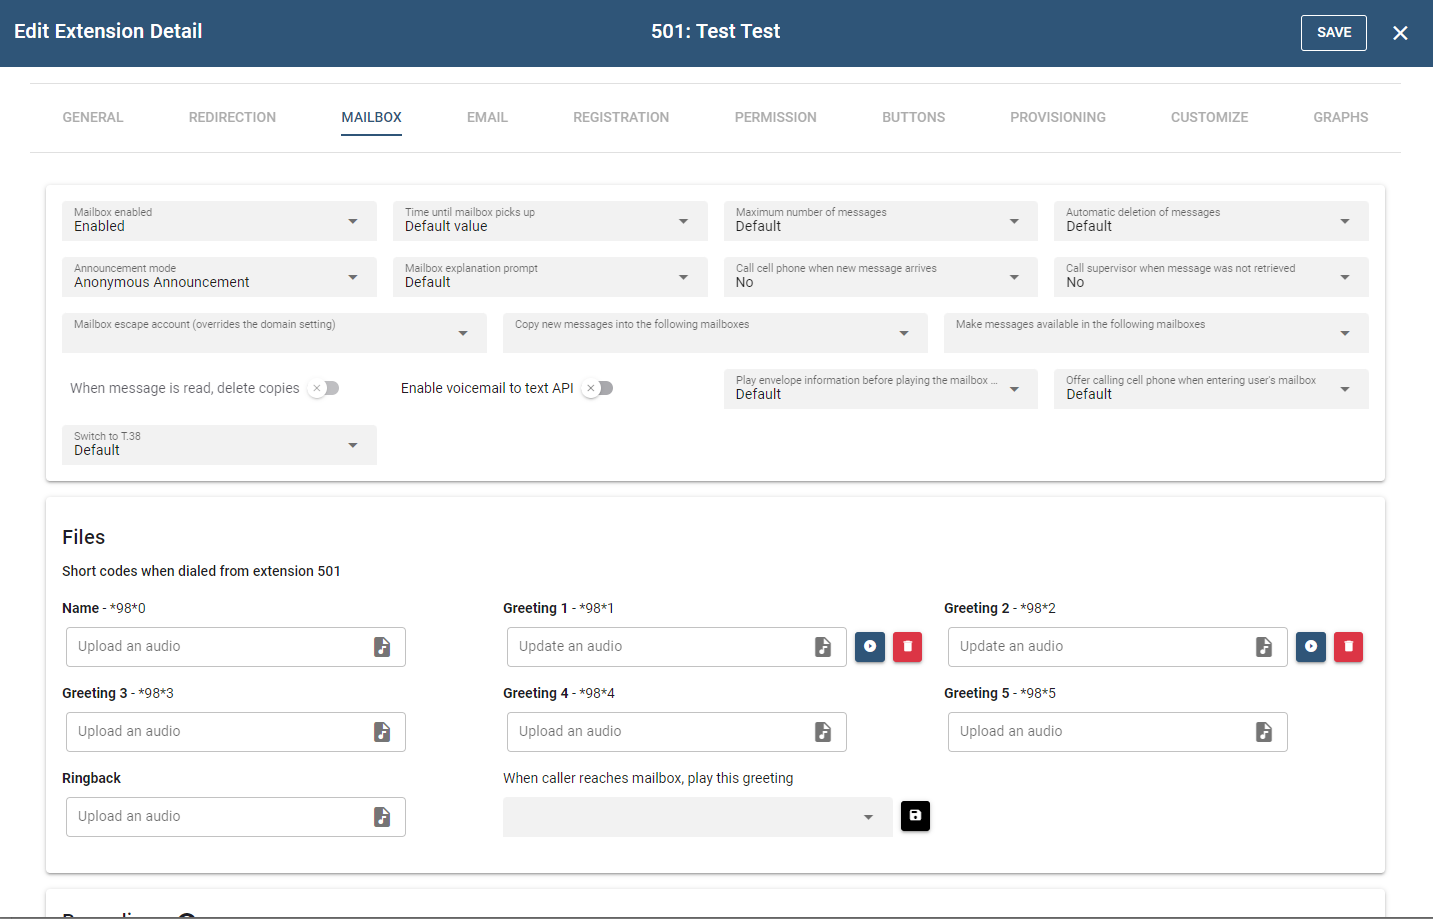
- Mailbox Enabled: From this setting, users can enable or disable their voice mailbox. If it is disabled, callers will not be able to leave messages, and the user will be unable to use the mailbox functions. If FAX is selected, this mailbox will not play any announcements and instead wait for the FAX signal.
- Time until mailbox picks up: This setting allows users to specify how long the system should wait before redirecting calls to the user's voicemail. If Call forward no-answer timeout has been set, the shorter timeout will be executed first. If the cell phone in calls to extension has been set (see Redirection settings), the system must be given enough time to call the user's cell phone (which may take 10 or more seconds) and enough time to view the caller-ID. The default is 20 seconds.
- Maximum number of messages: This setting allows the user to specify the maximum number of voicemail messages that should be stored at any one time. If the maximum has been reached and a caller wants to leave a new voicemail message, the system will attempt to delete a saved message. If space is still unavailable, the system will inform the caller that the mailbox is full.
- Automatic Deletion of messages: "Make room for new messages" - This setting deletes the number of messages enough to clear the mailbox messages to make room for new messages. E.g., if one sets the "max number of messages" to 50 and it has 40 messages in it now, and if 5 new messages arrive, the oldest 5 will be deleted ASAP to make room for the new ones and not hit 50 in the process.
- Announcement Mode: From this setting, users can choose an announcement that callers will hear when reaching their extension.
- Anonymous Announcement: The caller will hear the number of the extension.
- Name Announcement: The caller will hear the recorded name of the extension if one is available.
- Mailbox Explanation Prompt : This prompt gets played when a voicemail is left for an extension. But that can be modified using the three drop-down options under this setting:
- Default: This setting plays the Mailbox Explanation Prompt by default.
- Always: The Mailbox Explanation Prompt will always play, whether the Greeting is set or not for that mailbox.
- Not on Personal Greetings: If there have been personal greetings uploaded and selected from the Files section, then those will play when someone reaches the callee's mailbox and not the Mailbox Explanation Prompt.
- Call cell phone when new message arrives: If users have decided against forwarding their calls to their cell phone but still want to be alerted when a new message arrives on their extension, they can activate this feature. Once a caller has left a message, the system will call the user on the cell phone. After the announcement, the user must press 1 to hear the message. If the message cannot be delivered, the PBX will be retried up to three times.
- Call supervisor when message was not retrieved : This setting will call the give senior / mentor / manager if the voicemail is left on this extension that was not heard / acknowledged within any of the specified times given in the drop-down option.
- Mailbox Escape Account (overrides the domain setting): This setting gives users the option of changing the direction that a call will take once the caller presses 0 to speak with the operator. The extension that is entered into this field will receive the calls that the user thinks are directed at the operator.
- Copy new messages into the following mailboxes: This setting and the next setting (Make messages available in the following mailboxes) allow users to create group mailboxes. A group mailbox can be used for anything from a joint boss/secretary mailbox to a place to collect after-hours calls or holiday calls. All parties will be notified of incoming messages by the MWI (Message Waiting Indicator) on their phones. Users can listen to the messages from their voice mailbox from an outside phone or an outside line on their phone for instructions on accessing voicemail from an outside phone. When messages are copied in contrast to be made available, operations like deleting the message and marking the message as urgent only affect the copy of the message, not the original message.
- Make messages available in the following mailboxes: Like the previous setting (Copy new messages into the following mailboxes), this setting can be used to establish group mailboxes. However, when someone deletes the message or marks it as read, all copies of the message are affected. This makes sense for mailboxes that require a one-time response, for example, when a customer calls into a group and wants to receive a callback.
- When message is read, delete copies
- Enable Voicemail to text API
- Play envelope information before playing the mailbox message This setting allows the user to listen to the details of each voicemail message (e.g., time and extension number of the caller) before hearing the actual message, when the user calls their voicemail. This setting on the extension level overrides the one on the tenant level.
- Offer calling cell phone when entering user's mailbox: Before entering the mailbox, this option gives a choice of calling the user's cell phone before leaving them a voicemail.
- Switch to T.38: - Configure the mailbox to switch to a FAX mailbox after hearing 1, 2 or 3 CED tones from this option.
# Files
In this section, the ability to upload an audio file is possible.
- When the caller reaches mailbox : Select the audio file from the dropdown menu to determine which one will be played when a caller reaches the mailbox.
# Recordings
In this section, it provides the list of recorded calls of an extension account. Details regarding the call are documented in the table.
The next tab is Email for setting up the email address and other email settings of the extension.
The email settings on this tab allow users to receive emails as notification of all incoming calls on their extension. Users can also request an audio file, or WAV file, of voicemail that has been left on their extension.

- Email Addresses for extension (e.g. abc@company.com): This feature allows users to integrate their email account with their extension account. Voicemail messages will be sent to the user's email account according to the settings chosen below (a semicolon is required when entering multiple email addresses into this field).
- Send a mailbox message by email:
- Do not send an email: No email will be sent. This option should be used when the user prefers to use only the phone to receive voicemail messages.
- Send emails without attachments: Email notifications will be sent to the user for every voicemail that is received. This provides somewhat of a visual voice mailbox. The user will see the name and number of the caller and the date and time that the call arrived. To retrieve the voicemail itself, the user will need to call into the voicemail. The benefit of this mode is that emails that are relatively short can easily be read using mobile devices that support reading emails.
- Send message as an attachment to the email: The user's actual voicemails will be attached to the email notifications. This option should be selected if email is being used throughout the day and a personal computer is being used to process the email.
- After sending a message: This setting allows users to decide what to do with a voicemail message after it has been emailed to them:
- Keep message as new message: The message will remain in the user's mailbox as a new message. This option has the potential danger of eventually overfilling the voice mailbox. Administrators can use the Voicemail Size setting to restrict the number of voicemail messages.
- Mark message as read: The message will remain in the user's mailbox, but the system will drop the oldest message to make room for new messages if the mailbox becomes full. The disadvantage of this mode is that the message waiting indicator will not alert the user of new messages.
- Delete the message: The message will be deleted after the email has been sent. This keeps the mailbox clean, but because the system does not store voicemail messages permanently, the user will need to listen to the messages from the email client.
- Send email on missed calls: When this setting has been activated, the system sends the user an email for each missed call. Calls to a ring group or call queues are not included.
- Send email at the end of every call: When this setting is activated, the system sends the user an email for all calls. This feature is useful for keeping track of a group sales extension, a telemarketing campaign, or calls made to a new employee's extension. (When both "missed calls" and "all calls" have been activated, the user will receive two emails for each missed call.)
- Send email on status changes: The user will be notified of all status changes (e.g., toggling the DND status, changing the registration status, etc.).
- Send email when mailbox is full The user will be notified when the mailbox is full, which helps them to not loose any voicemails in the near future.
- Send emails if the call was rejected because of blacklisted number The user will be notified via e-mail if blacklisted number tries to call them anytime.
- Send email to following address(es) if the wakeup call is not answered If the user does not answer the call, based on the time call set, an email is sent to the address(es) listed here. Multiple addresses are set with a semicolon between them.
# REGISTRATION
The next tab is Registration for settings related to registrations for the extension. For one Extension, it can be registered to one or more devices. When an extension is called, the system will call all registered devices in parallel. The first device that picks the call up will get the call, and the other devices will receive a CANCEL message.
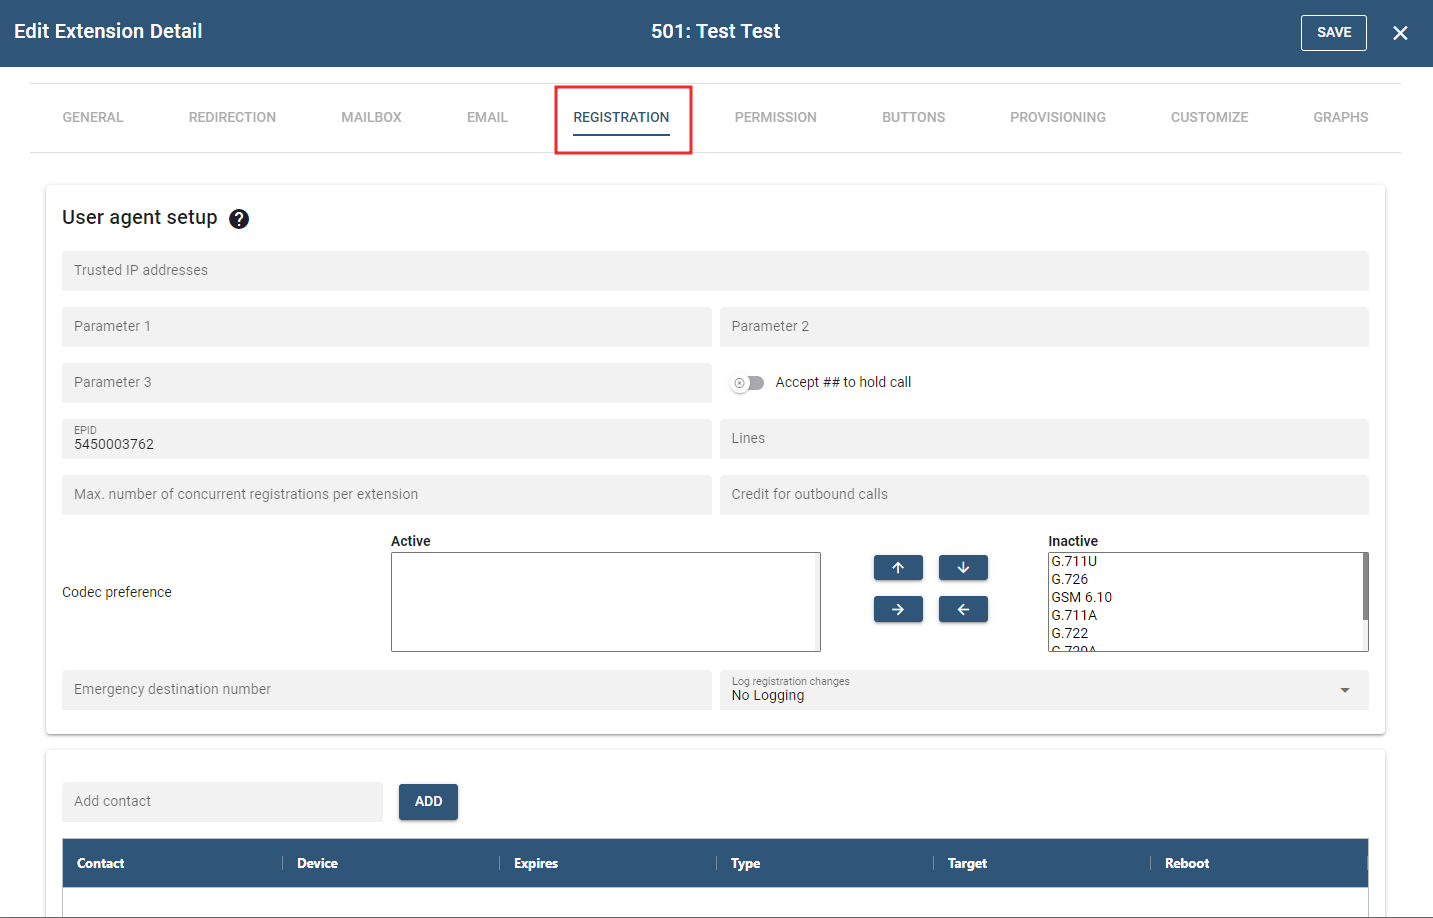
# User Agent Setup
- Trusted IP Addresses: This setting dictates which IP address or addresses can be registered to this extension. The system will accept registrations only from the specified IP addresses. For example, if the extension has been set to 192.168.1.2, and 192.168.1.5 tries to register, it will be denied with a 403 forbidden message. Use a space as a separator when entering multiple IP addresses. To indicate subnets, use a slash and the number of significant bits behind it (e.g., 192.168.2.0/24). Please note that the PBX will not check the password if the IP address matches
- Parameters 1 through 3: Parameters 1 through 3 allow the configuration of fixed values that can be used in conjunction with the "External Voicemail System" setting at the domain level. Without using these parameter settings, using a value of 7$u in the "External Voicemail System" setting tells the PBX to prefix the username (number) with a "7" before sending it to an external voicemail system. If you prefer to set a fixed value (e.g., 555) for the username, set one of the parameters to a specific extension (e.g., 555) and link it to the "External Voicemail System" setting by entering 7$1 (if using parameter 1) into the "External Voicemail System" setting. The PBX will then use 7555 for the ANI. These Parameter settings can also be used during the dial plan replacement operation. By default, the PBX uses "\r" in the dial plan replacement to substitute "trunk registrar." Similarly, you can use "\x" to use the value set in Parameter 1, "\y" to use the value set in Parameter 2, and "\z" to use the value set in Parameter 3.
- EPID: EndPoint Identifier is a random number created by the system and functions as a callback number. The EPID is sent on all 911 calls, enabling PSAP (Public Safety Answering Point) to call the extension back directly if the phone is disconnected or the person hangs up. The EPID is essentially a DID for that extension and ensures that a returned call will reach the extension from which the call originated even if there is an auto attendant in the middle. This works to enable 911's E911 service. A general callback number for all users across the domain can also be set using the ANI for emergency settings.
- Lines: The lines parameter is used during provisioning to tell the phone how many line keys it should allocate (whenever applicable). The line feature is also used to restrict the number of calls that an extension can make. For example, if 1 is used in this field, then calls cannot be made simultaneously from both the office phone and the home office phone. During an active call, the system will neither page the extension nor perform intercom calls to that extension.
- Max. number of concurrent registrations per extension: This setting is used to restrict the number of phones that can be registered to an extension. This is useful for service providers or enterprises that want to ensure only one phone is registered per extension.
- Credit for outbound calls: This setting is used to place a limit on outbound calling for the extension only. It can also place a limit on outbound calling at the domain-level settings.
- Codec Preference: This setting is used to specify the codec preference for the extension. This setting is useful for a remote phone with limited bandwidth, as you can force a low-bit rate codec like GSM or G.729 to be used on the extension. The format for this setting is similar to the Port Setup section of the system.
- Emergency Destination Number: This setting is used when running the extension in a remote location where a different police department should be called. Finding the Public Safety Answering Point (PSAP) for this number is needed; however, it is not a guarantee that a call will be routed there, so ensure that this is tested or approved if your carrier does not have 911 service. Once this setting has been populated, the number entered into this field will be dialed once a user dials an emergency number configured in the Emergency Numbers Setting.
- Log Registration Changes: This setting allows the domain administrator to specify a log level for registration log messages specifically for the extension. This setting makes tracking down registration problems easier. This setting also included the chance to select who should receive an email when the registration status does change—the administrator, the user, or both.
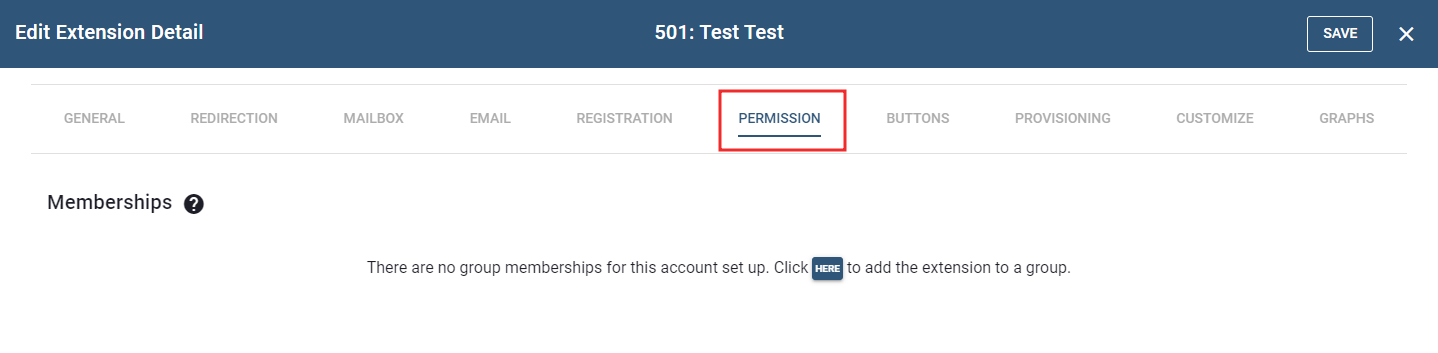
# PERMISSION
The next tab is Permission which allows us to define what permissions the extension has. Permission to manage the tenant should be given only to people allowed to change passwords, create, or delete accounts, change dial plans and rates, and so forth. Permission to jump into calls and listen to conversations may be legally restricted in certain countries; please use extra caution here. This feature can be completely disabled by the license key for the system. The permission to override DND is useful for assistant extensions responsible for screening calls. Please define the permissions as a list of extensions, separated by space. Using wildcards, for example, * to match all extensions of the tenant.
# BUTTONS
The next tab is Buttons for setting up the buttons of the device that will register to this extension. Specify which button profile to assign to the extension. Selecting Automatic will automatically assign the correct default profile based on the snom phone type. Or by selecting any other profile, default, or any other profile that has been created (it is possible to create or change any of the profiles in the Buttons page of the tenant. Or defining an extension-specific profile. If using a selected profile (default or otherwise) turn this into an extension-specific profile by editing it and saving it at the bottom of this page.
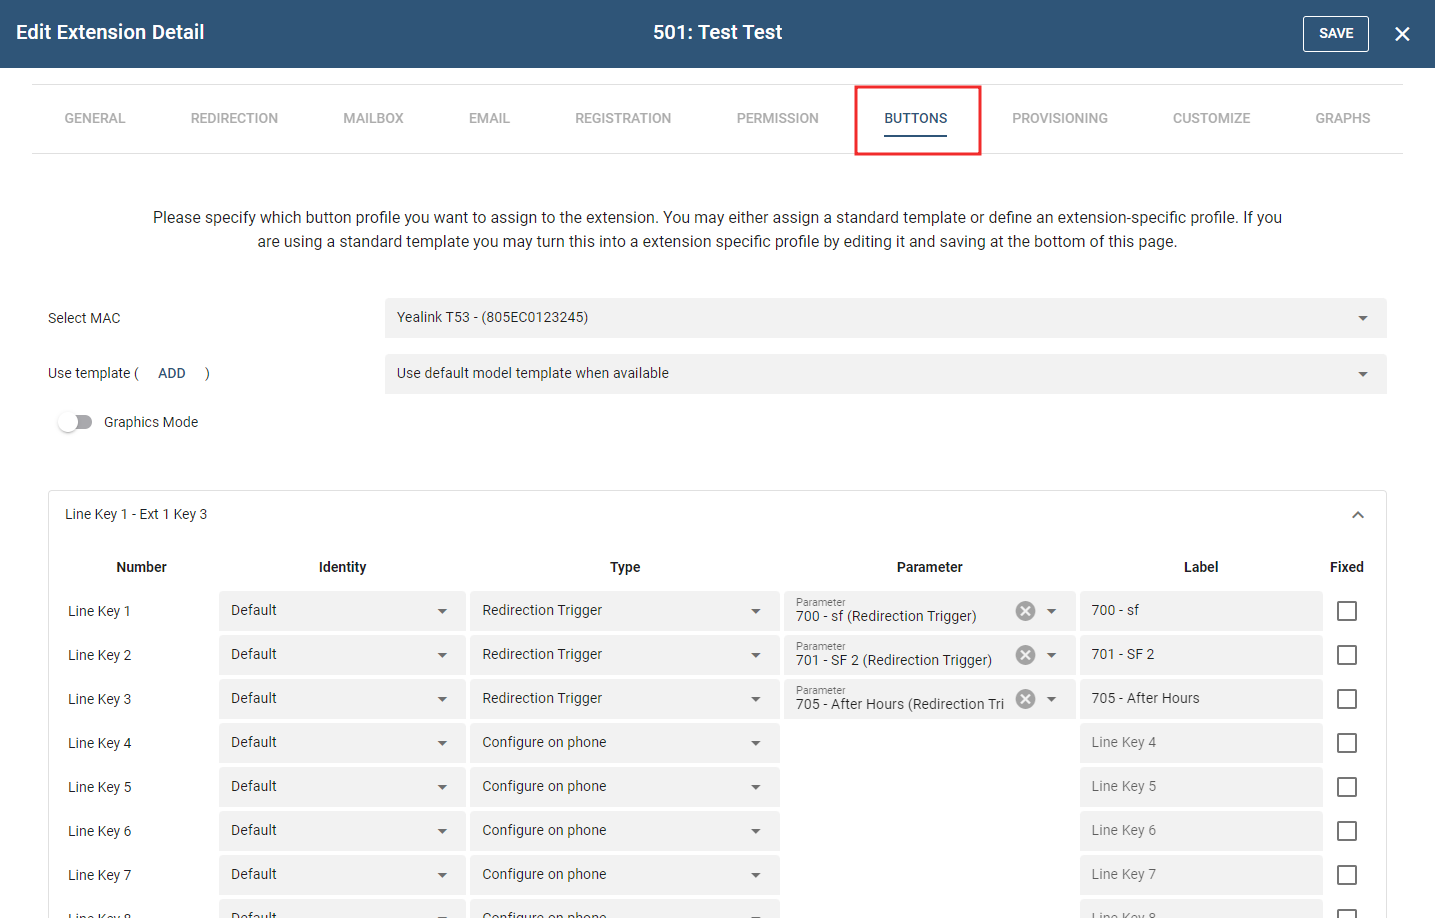
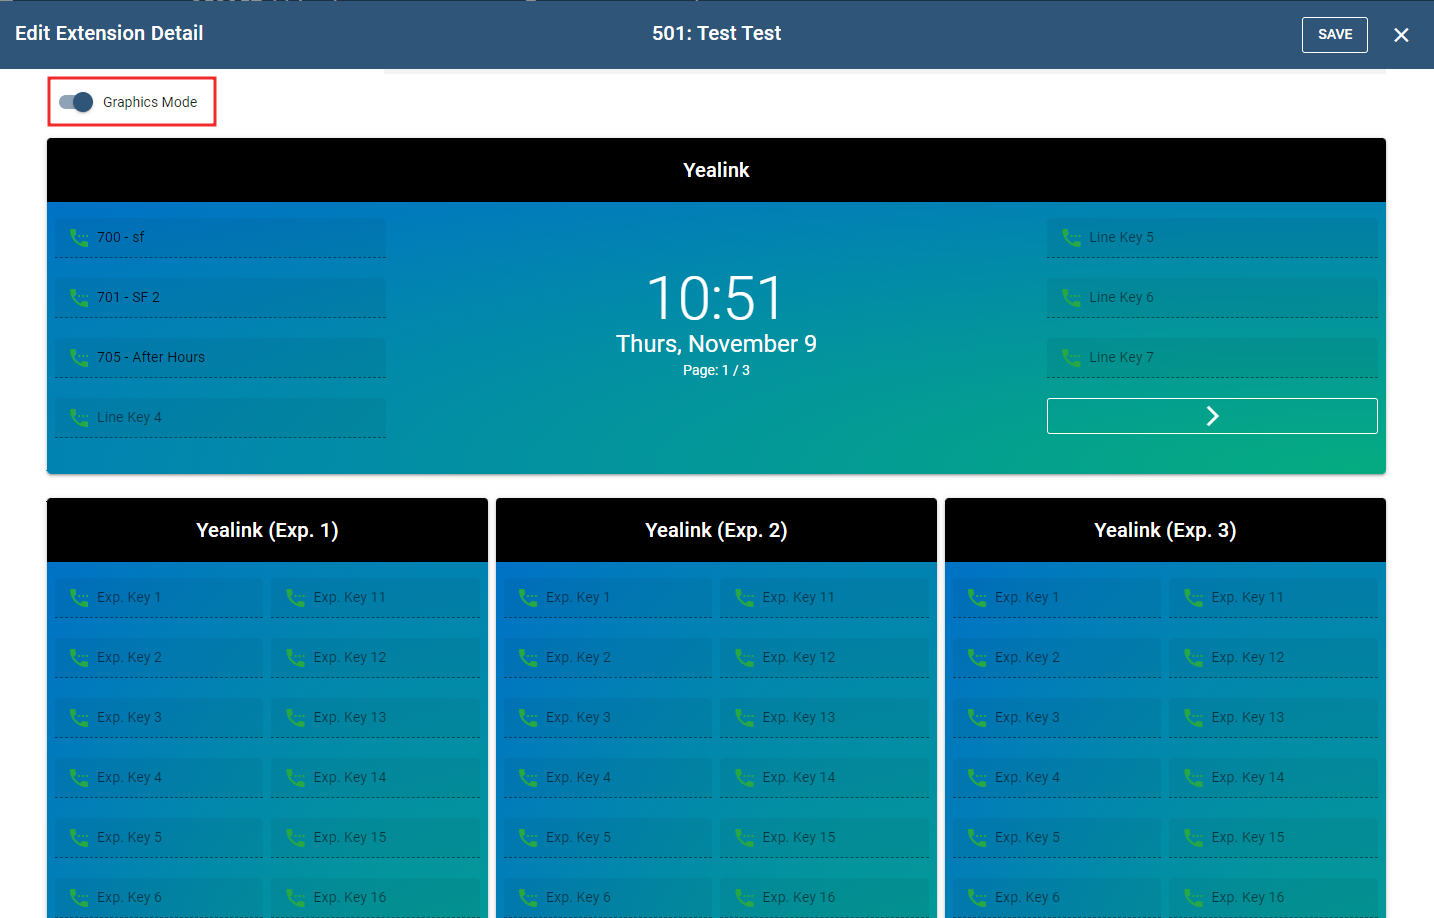
- Graphics Mode : Enabling graphics mode will activate the graphical user interface (please see screenshot below for reference).
# PROVISIONING
The MAC Addresses displayed in the "Bind to MAC Address" table below are associated with Extensions 503 (based on the screenshots provided below). Each MAC Address is linked to a specific device, meaning that one device corresponds to one MAC Address.
MAC Addresses are unique, and once they are assigned to an extension, they cannot be used for any other extension unless you choose to return them to the unassigned pool. When a MAC Address is in the "Unassigned" status, it can be assigned to other extensions.
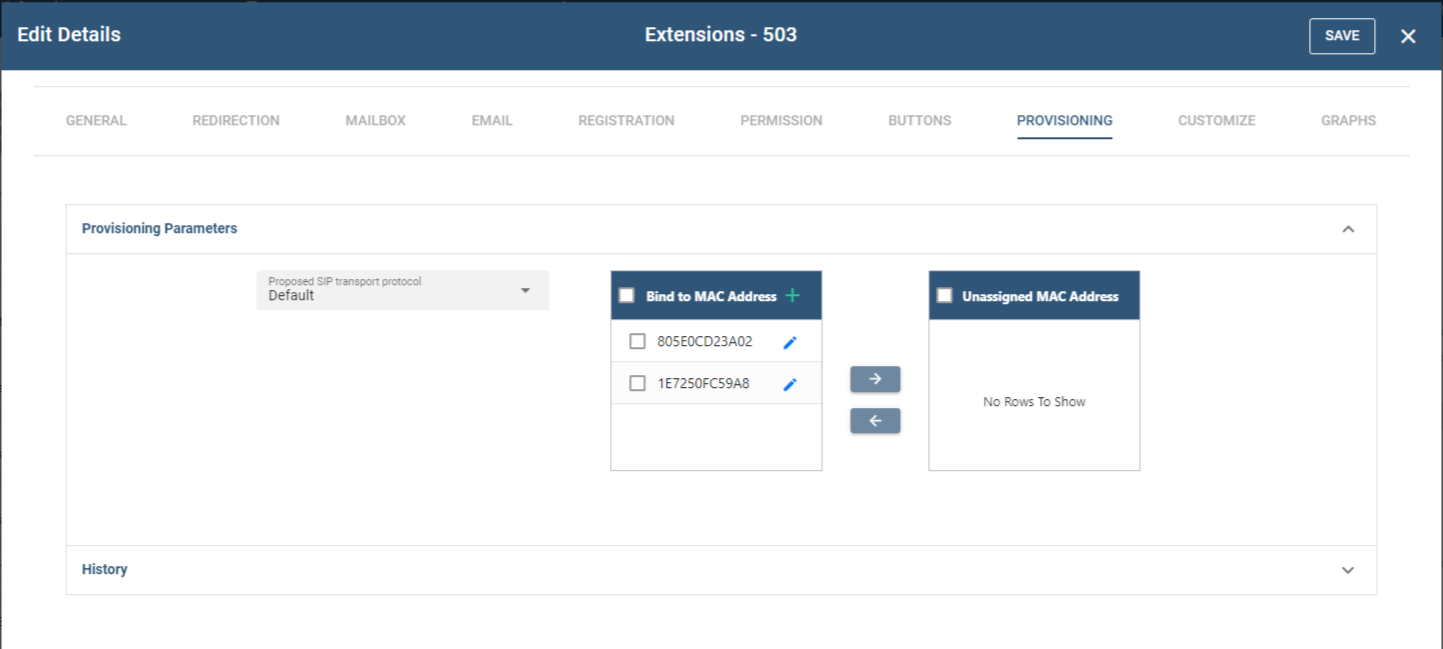
To remove a MAC Address assignment, you can follow these steps:
- Check the box next to the MAC Address you want to unassign under the "Bind to MAC Address" table.
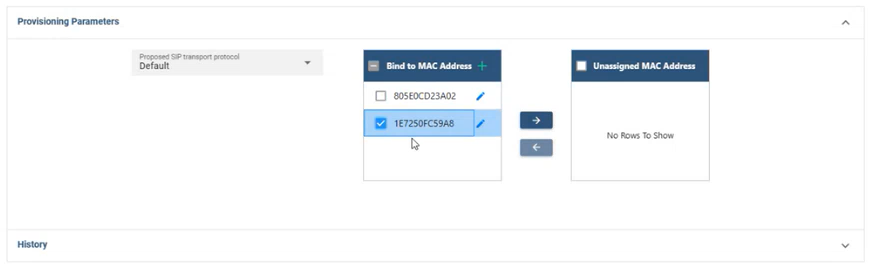
- Then, click the arrow pointing to the "Unassigned MAC Address" table.
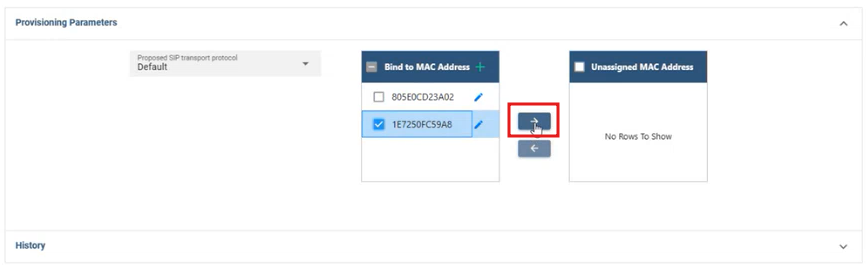
- Once the MAC address is moved to the Unassigned list, click the button to process the updates.
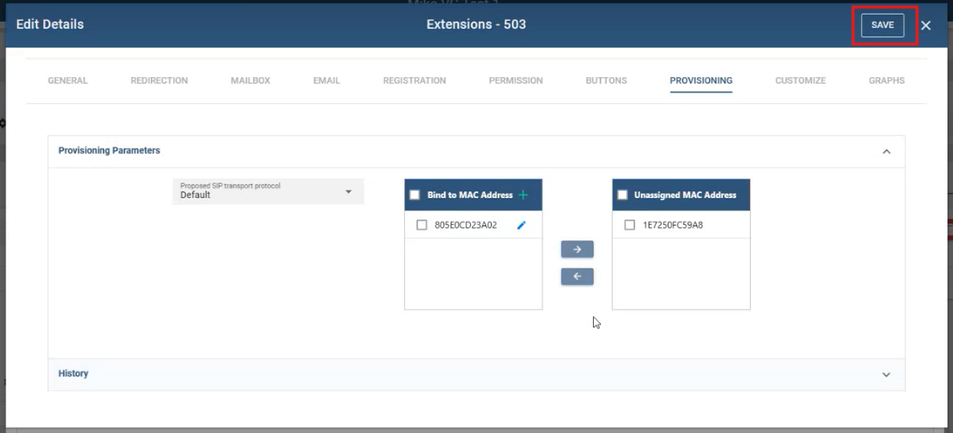
Conversely, to assign a MAC Address, follow a similar procedure:
- Check the box next to the MAC Address you want to assign under the "Unassigned MAC Address" table.
- Then, click the arrow pointing to the "Bind to MAC Address" table.
- Click ""SAVE"" to apply the updates.
Note: All changes will only take effect once the button is clicked.
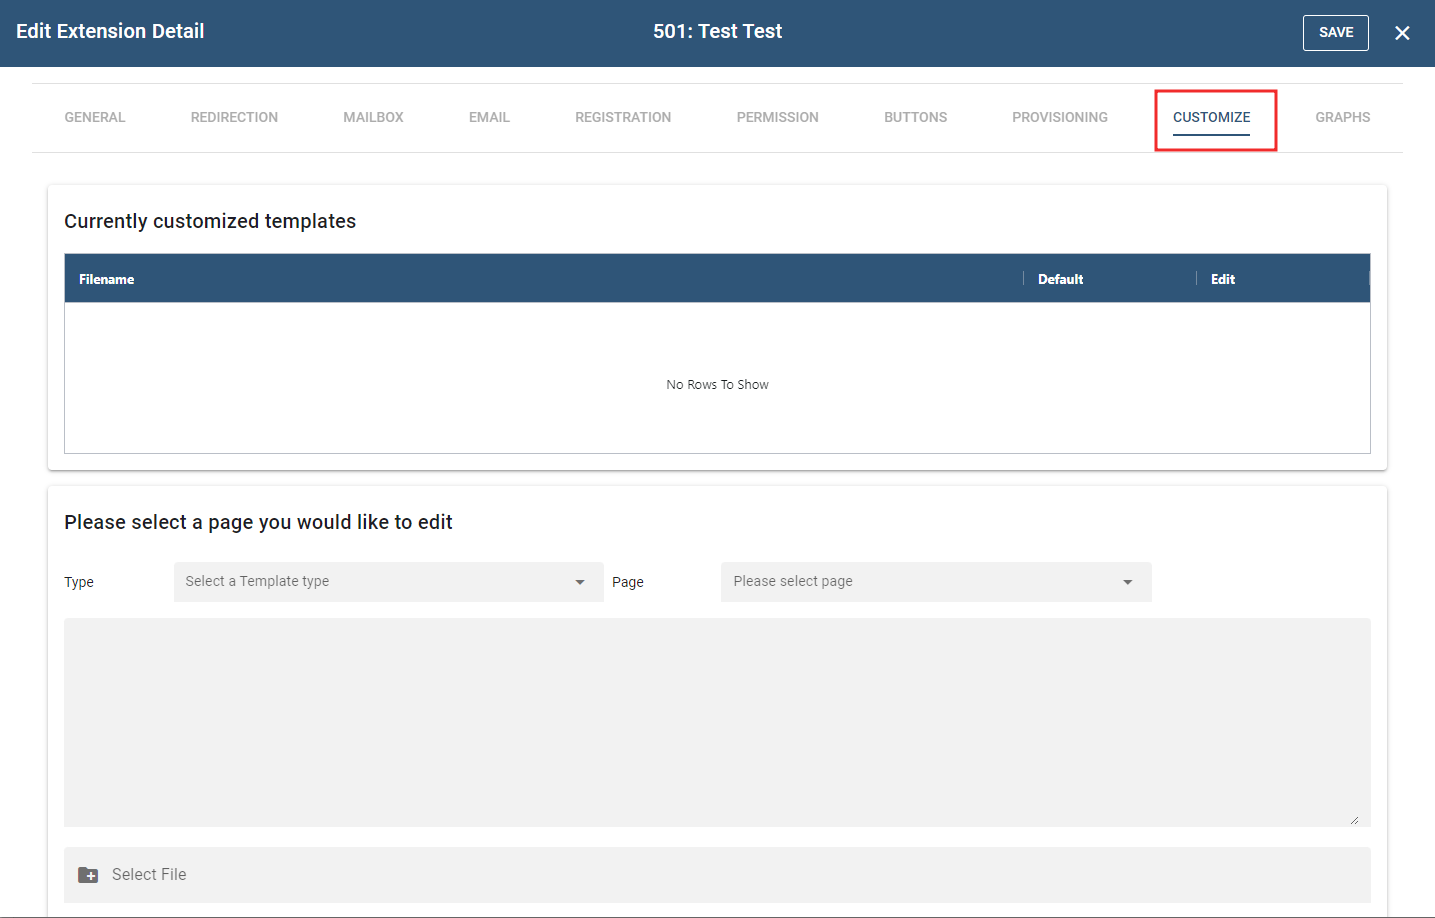
# CUSTOMIZE
The next tab is Customize which enables to change the look and feel for this user. It can also change the web pages & phone config templates, etc.
# GRAPHS
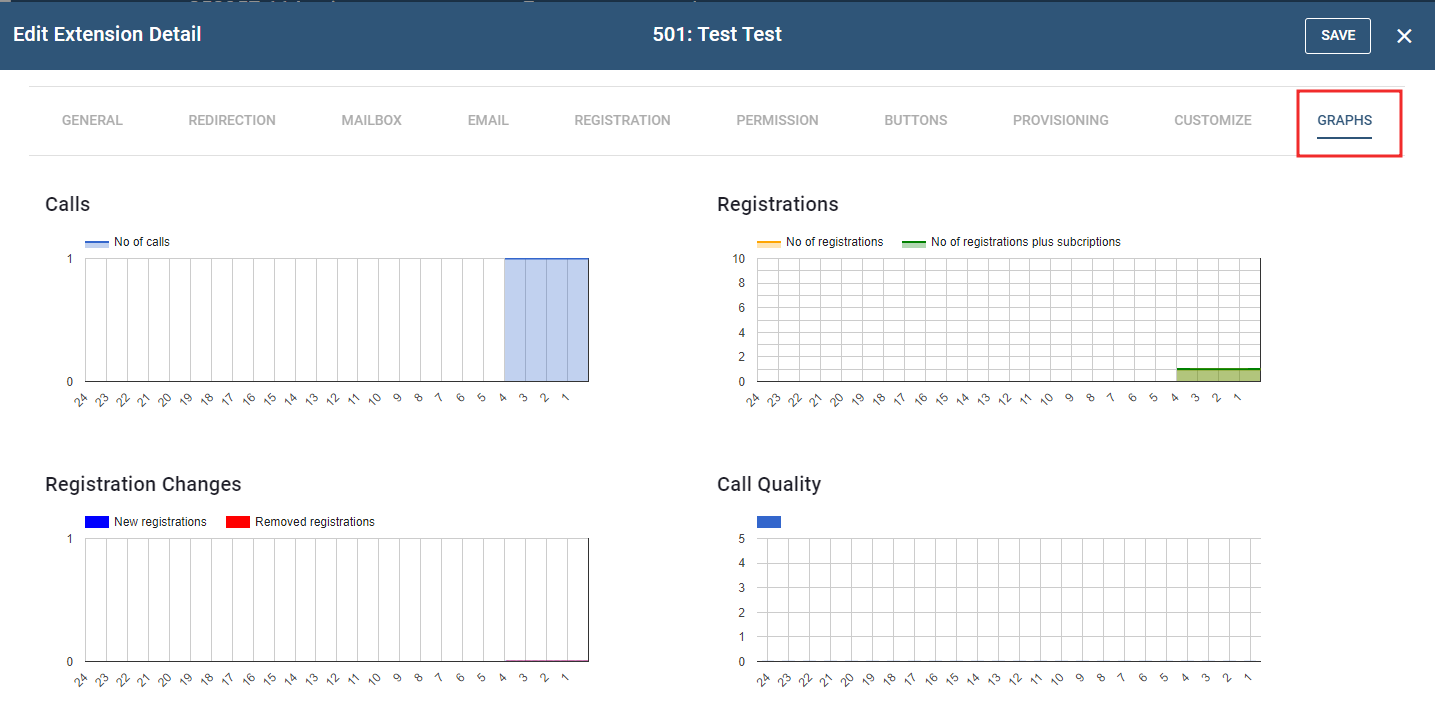
- Calls. The calls graph shows how many calls were made. There are two graphs. The first one shows how many call legs were active and the second one shows how many calls were in use. The call leg count is important because it is a better resource indicator than the number of calls.
- Registrations. The system keeps track of registrations and subscriptions. Ideally, this graph shows a flat line, but as devices sign in and out, there are changes in the graph. Subscriptions include BLF and MWI subscriptions.
- Registration Changes. To amplify registration changes there is a separate graph that shows the changes in registrations. Even though the total number of registrations may be unchanged when one device registration expires and another device signs on, this graph will show the changes.
- Call Quality. The system estimates the call quality on a MOS scale. This makes it easy to spot quality problems on the system, tenant, extension, and trunk level.
NOTE: All changes will only take effect once the button is clicked.
← Numbers Call Queues →