# Call Flow
A call flow is used to provision a hosted phone system for a business. This page allows to manage Direct Inward Dialing (DID) and primary call routing.
All the provisioning and configuration tasks conducted through the sidebar menu can be efficiently completed within the Call Flow page. This includes various settings and adjustments necessary for managing call flows.
To provision, there are two options available: adding a feature using the "add" button or utilizing the "drag and drop" functionality.
# How Drag and Drop works
Drag and drop is a user interface interaction that allows users to move the destination accounts and numbers to create a call flow.
- Begin by selecting a call flow feature. Click the account you want to setup with.
- After clicking, hold down the mouse button (in the case of a desktop computer) or touch and hold the item (on a touchscreen device).
- When it typically becomes "attached" to the cursor or fingertip, you can now dragged the account and place it in the blank canvas by releasing the mouse button or lift their finger (in case of touch interface).
Note: Each drag-and-drop action will automatically generate and save the corresponding data.
# How to remove a feature from the canva
To remove a feature from the canvas or cancel a feature;
- Removed the assigned number first by dragging it back to the Numbers section. If there is no number assigned yet, please proceed to the next step.
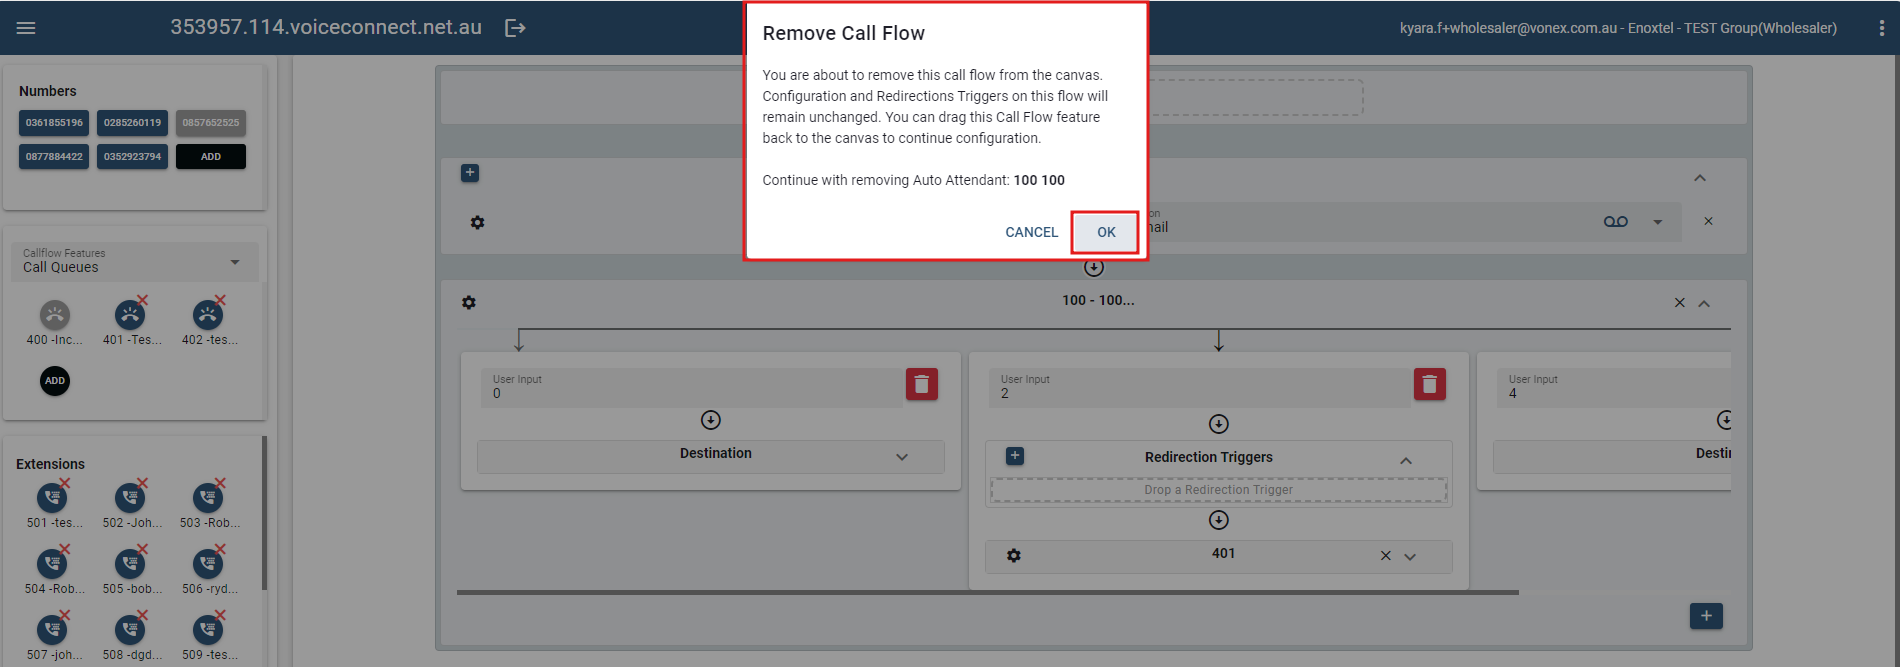
- When the number is already removed, a delete icon will appear beside the account name. Simply click the "x" icon of the call flow feature selected.

- Once clicked, a confirmation prompt will appear to confirm the deletion of the account. Click "OK" to completely remove it from the canvas.
Below are the most frequently used provisioning processes that appear on the call flow page.
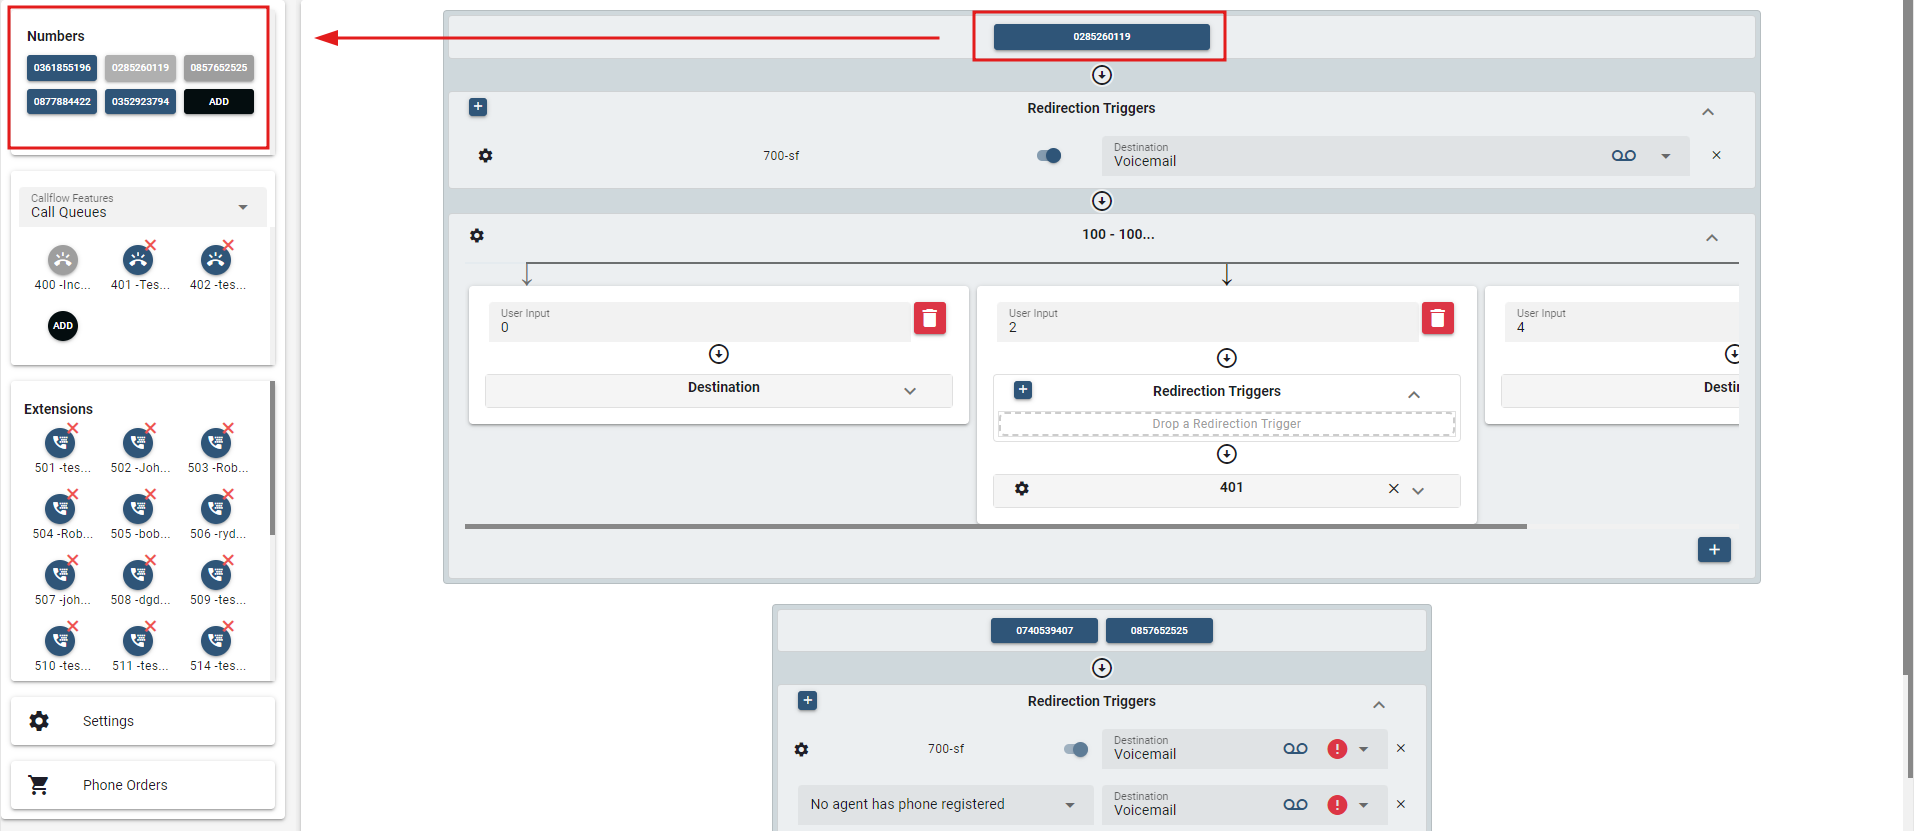
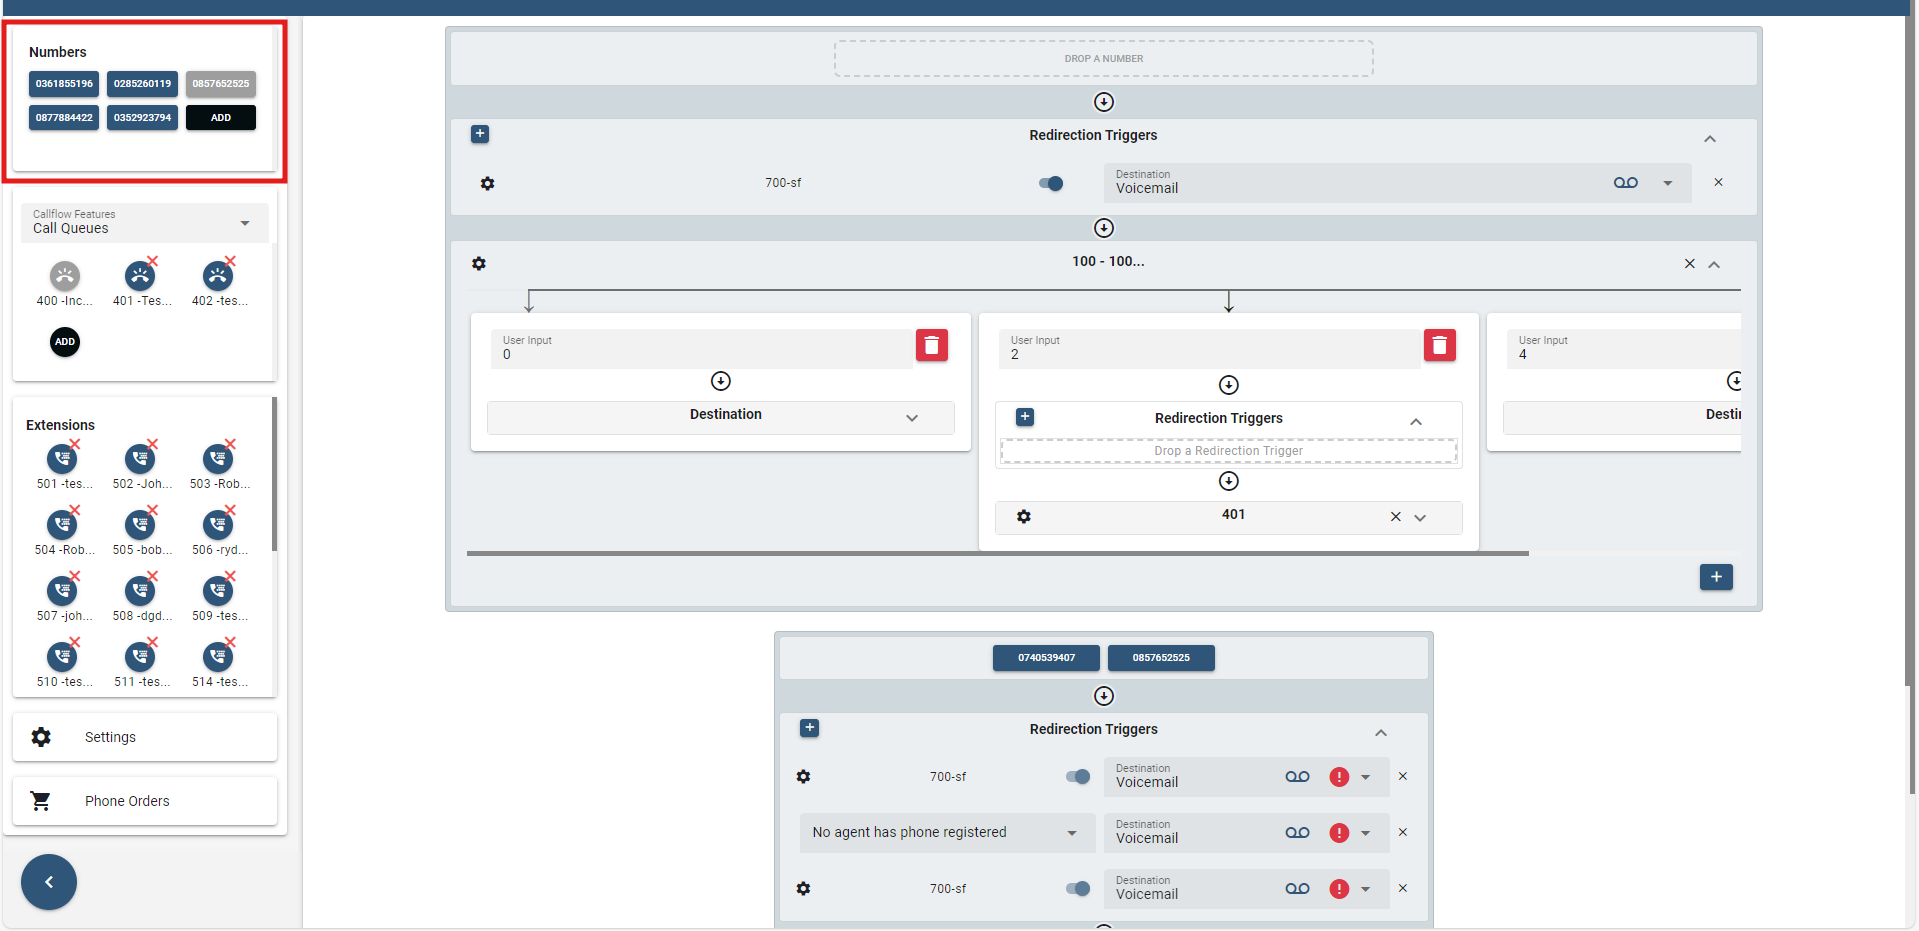
# Numbers
In the numbers section, this shows the available DIDs for the selected domain. When the numbers are greyed out, it indicates that it is already being used and allocated to a call flow, whereas the numbers that are displayed in blue remain unassigned and can be dragged.
# How to Provision
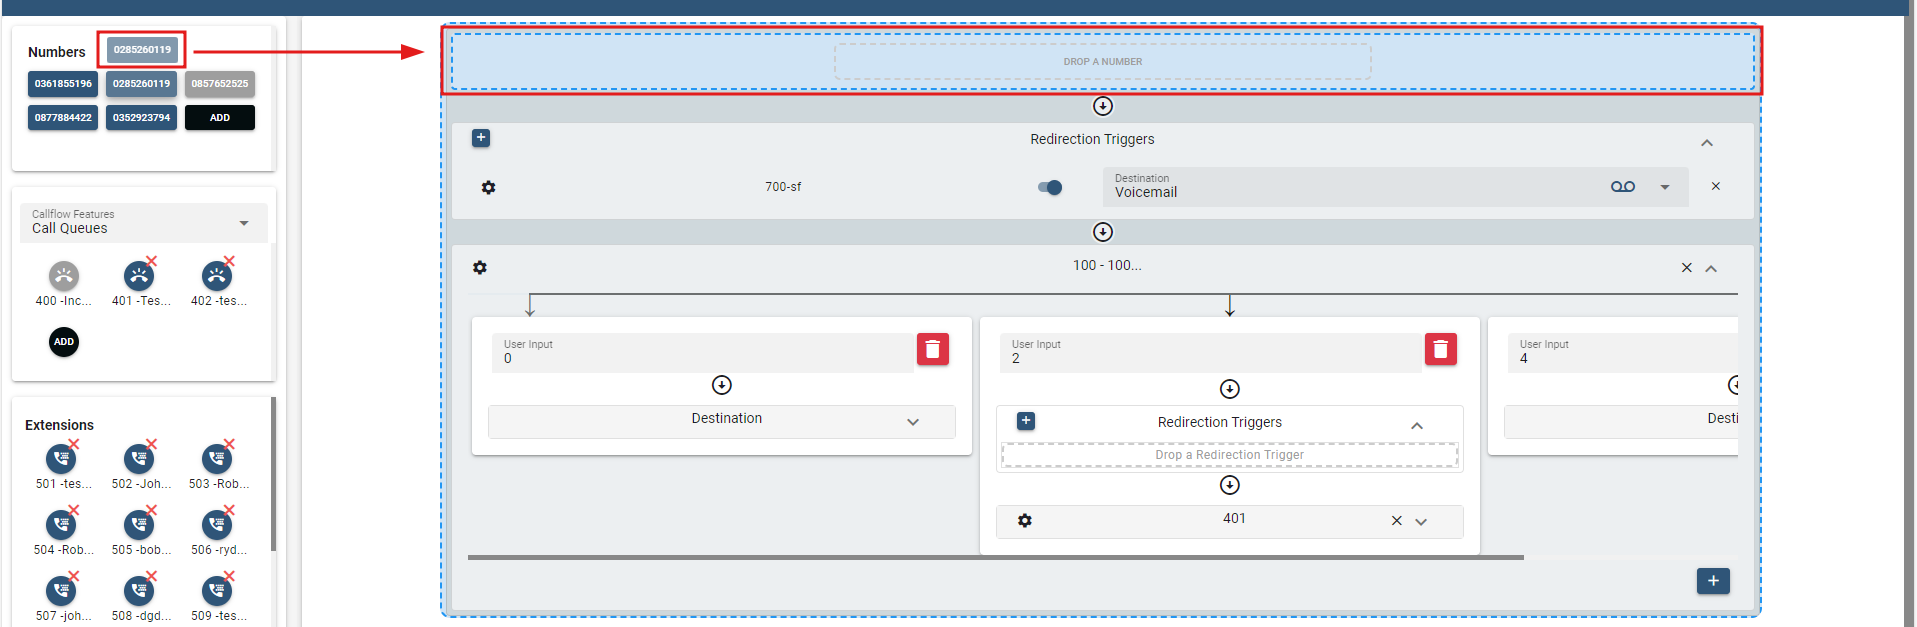
When routing incoming calls from each Number to a specific account;
- First, select a destination account from the callflow feature section and place it in the blank canvas through drag and drop functionality.
- Next, select a Number and drag it within the "Drop a Number" section, in the highlighted part of the selected destination account.
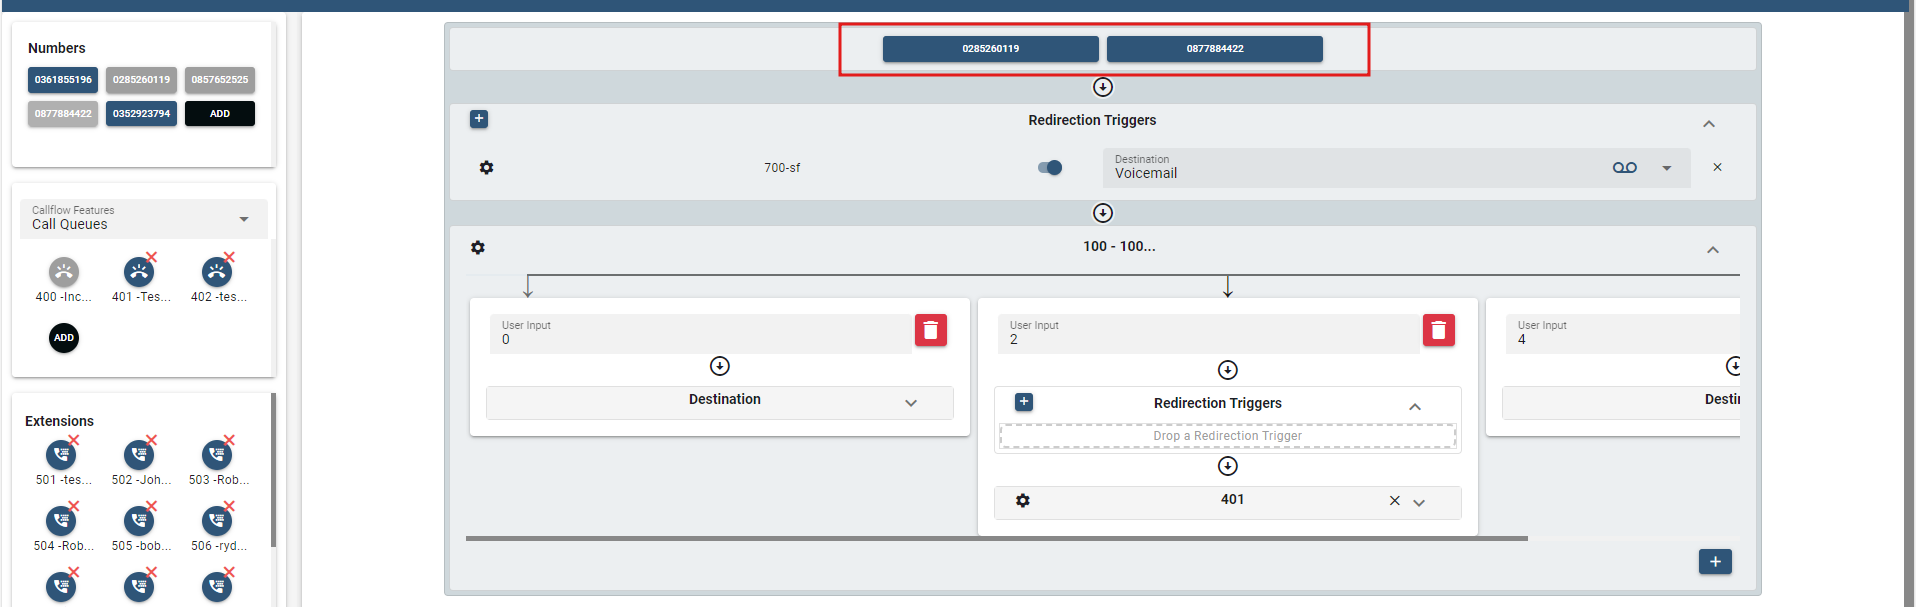
In addition, the ability to add multiple Numbers to the same account is also possible.
Note: Dragging multiple DIDs to a certain call flow will only work if the call flow has been already associated with an account. If a new DID is dragged to a call flow without an associated account, it will create a new call flow.
# How to ADD a Number
The steps outlined below demonstrate how to add a number on the Call Flow page.
- In the Numbers section, click the button.

- Once clicked, a new window will pop up. Provide all the details required.
- When all the fields are populated, click on and this will process the ordering of number in the Utilibill.
To configure the Number;
- Select the number to be configured in the Numbers section. Double-click on it to open.
- Following that, a new window will pop up to edit the DID details.
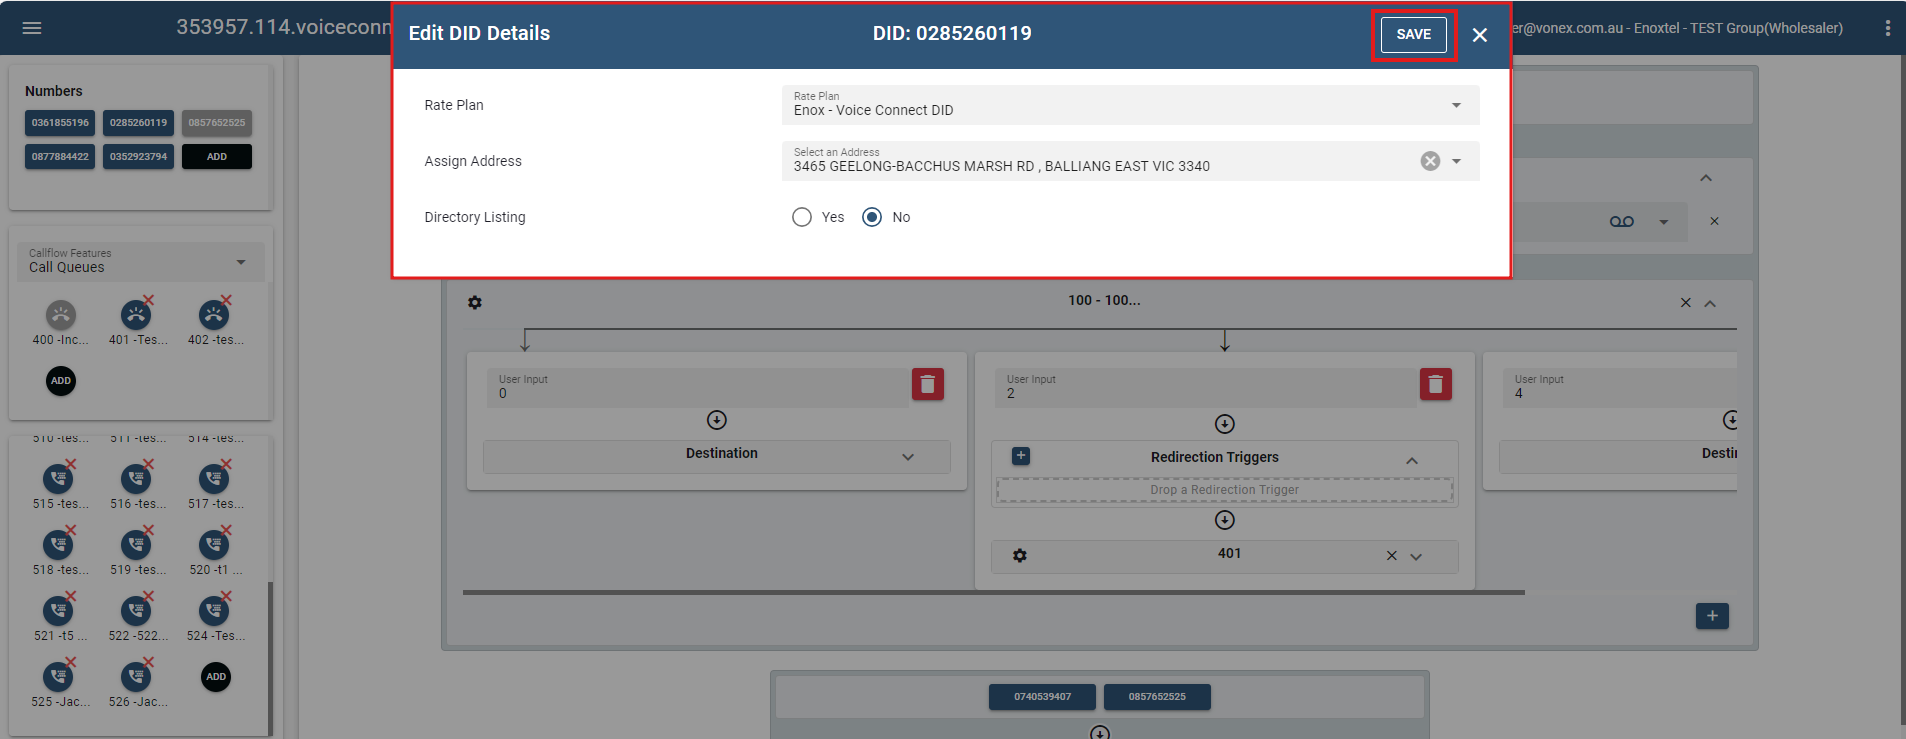
- Once done, click the button to process the updates.
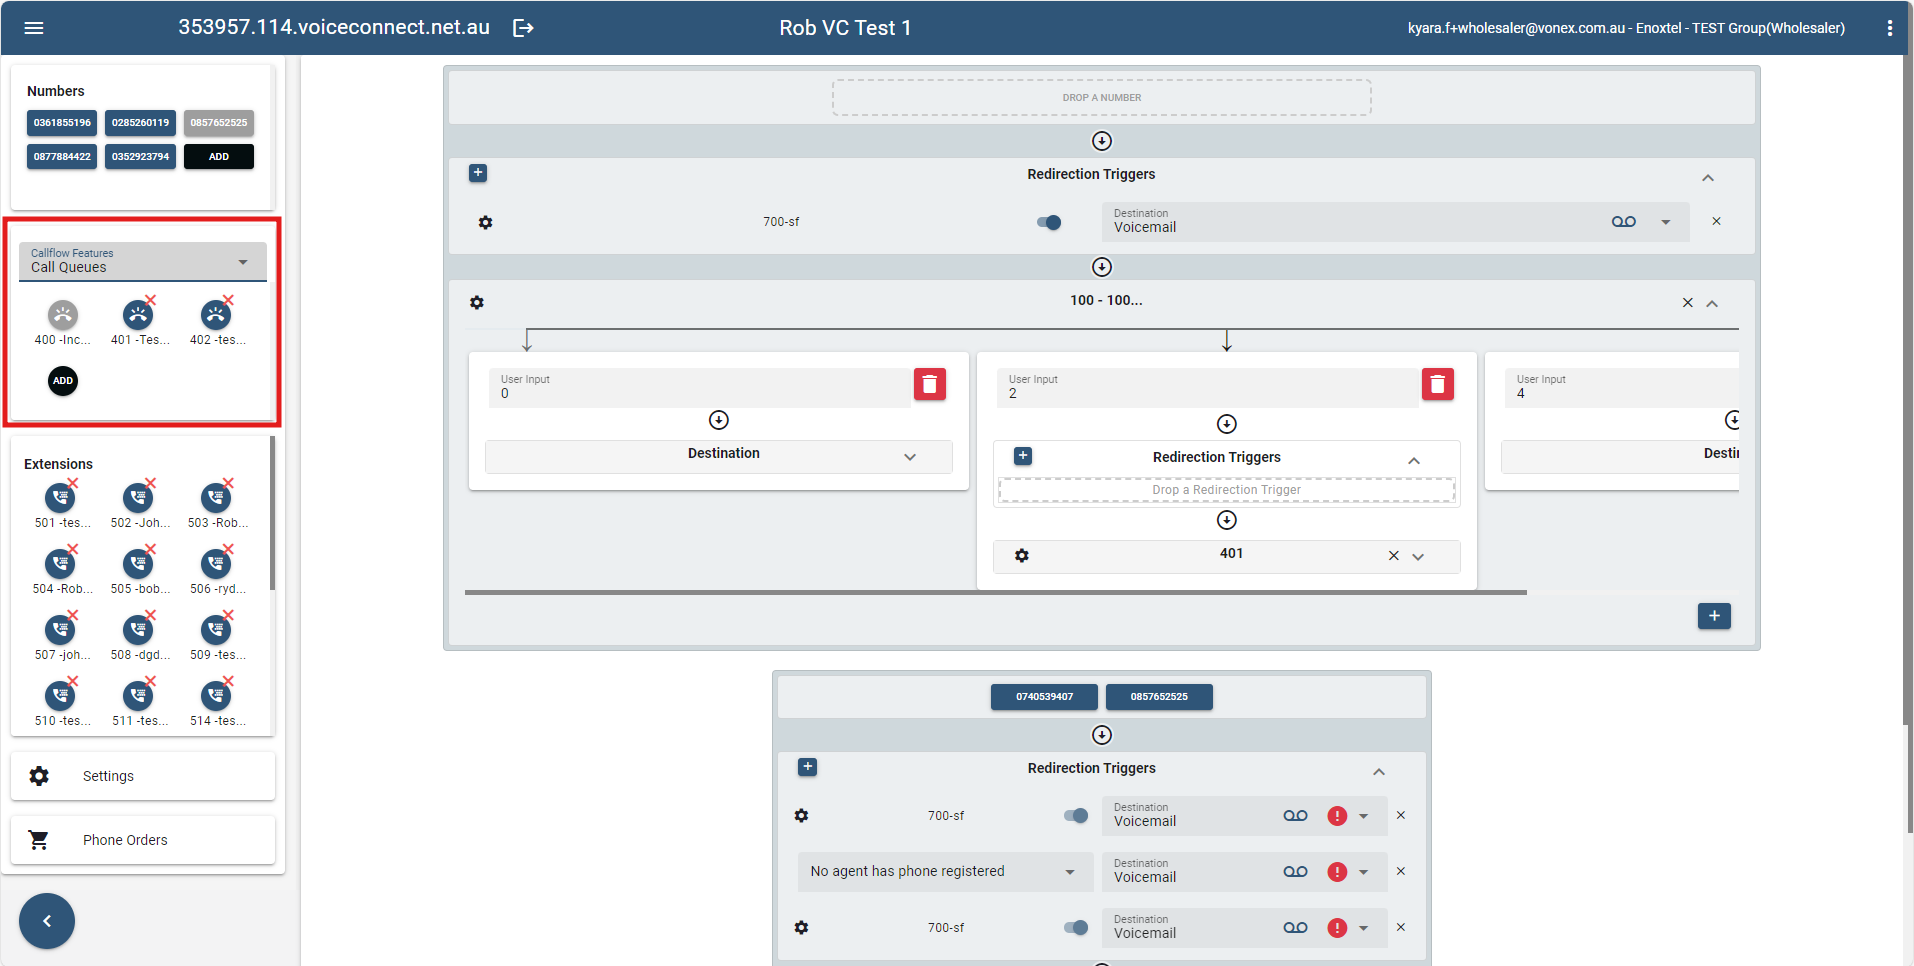
# Call Flow Features
In this section, this provides the different destination types which you can find in the dropdown list. For every destination type selected, destination accounts will also be shown.
Note: The same with Numbers, greyed-out accounts indicate that it is already being used and allocated to a call flow, whereas numbers that are displayed in blue remain unassigned and can be dragged.
- Destination Type includes Call Queues, Ring Groups, Auto Attendants and Redirection Triggers
- Destination Accounts depends on the destination type selected.
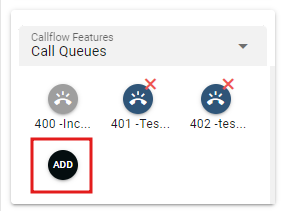
# How to add an account in the Callflow Feature section
The following steps demonstrate how to add a destination account on the Call Flow page.
- Select a destination type under Callflow Features section.
For example: Ring Groups 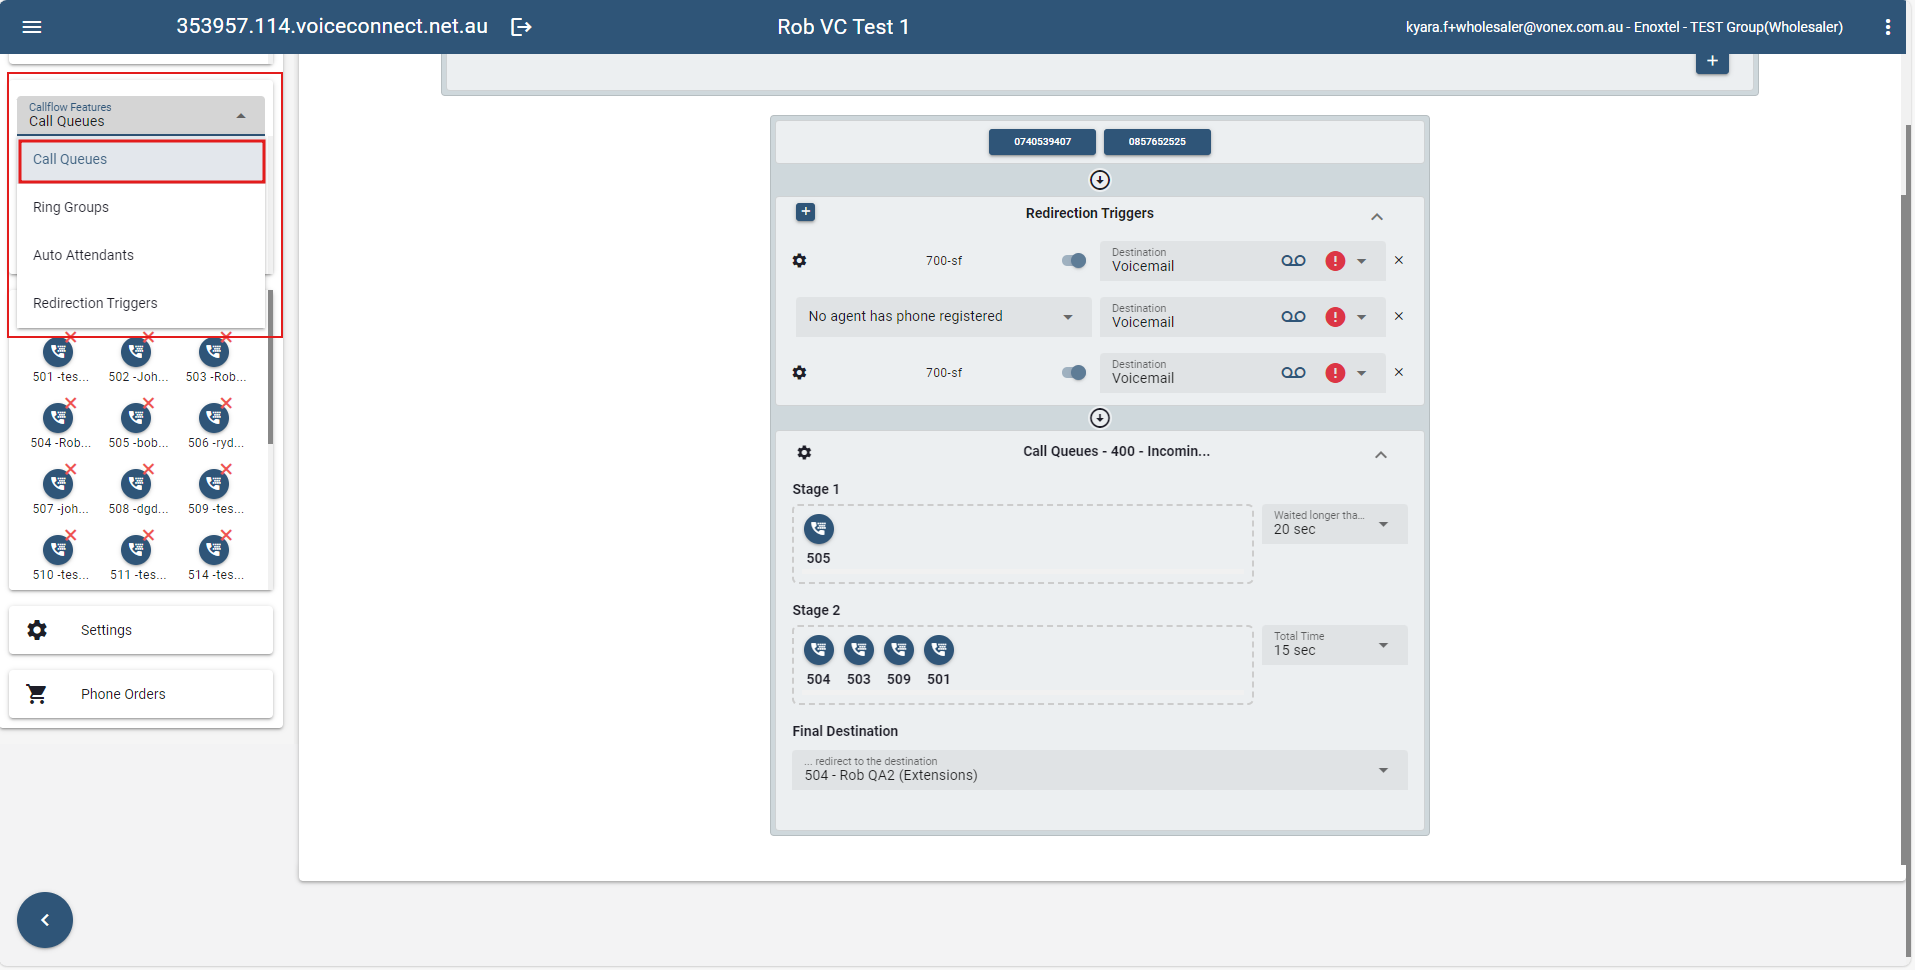
- Click on the button of the selected destination type.
- Once clicked, a new window will pop up. Provide the required field.

- In the Display Name field, enter a descriptive name for the new account.
- Account Number will be generated automatically upon creating a new account.
Then, click on .
Once an account is created, double-click on it, and its settings can be accessed and modified.
# How to remove an account in the Callflow feature section
- Click on the (x) icon of the account to be removed.

- Subsequently, a confirmation prompt will then appear to verify the deletion of the account.
Click .
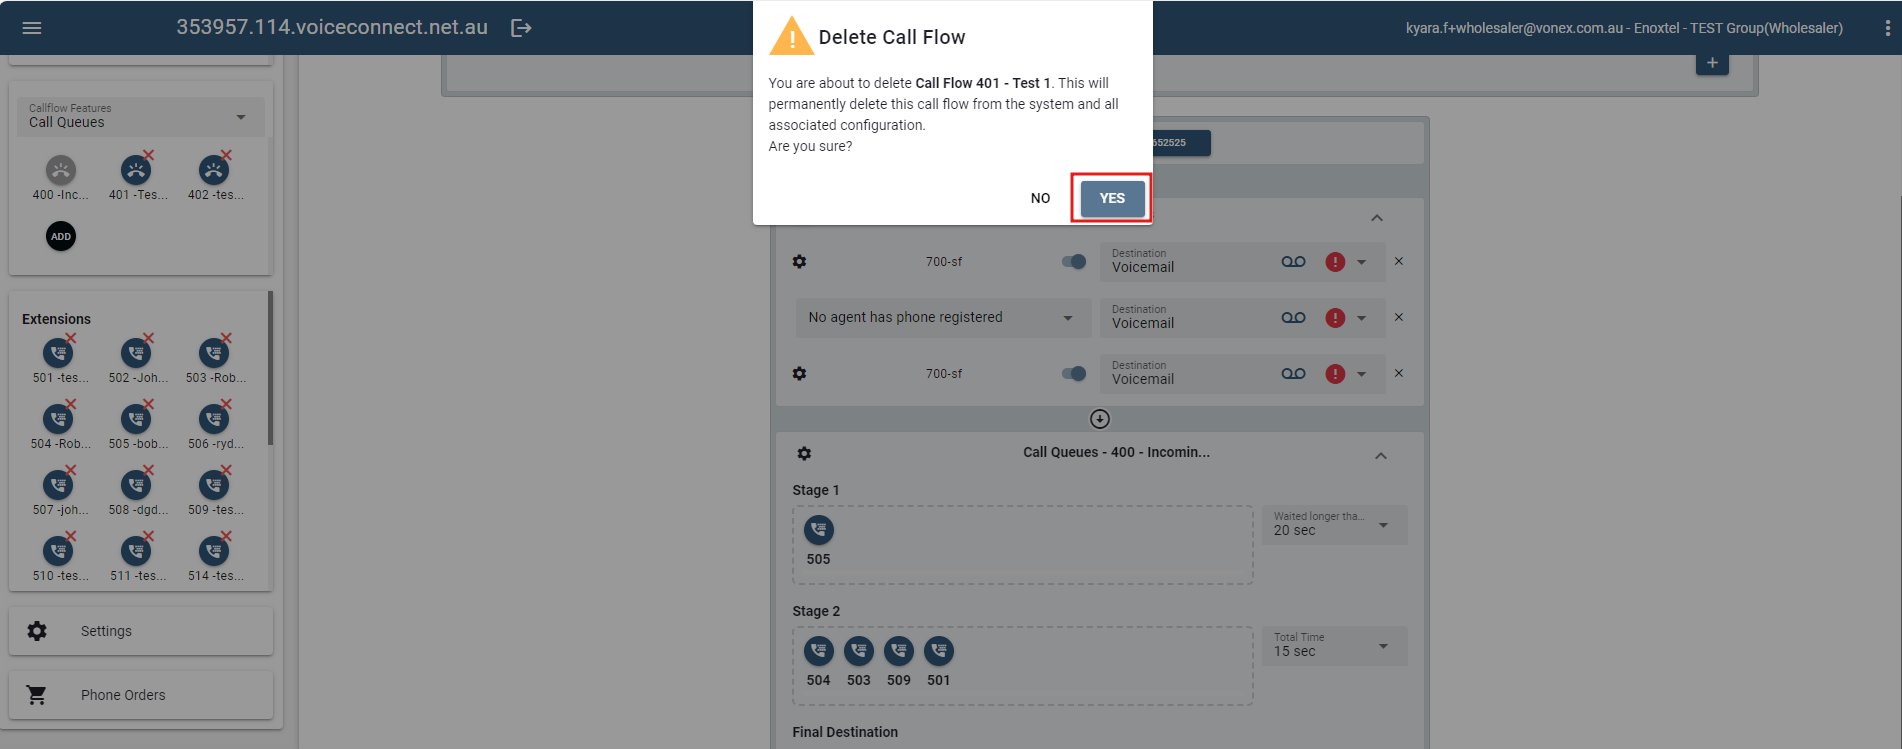
- Once done, a green notification bar will pop up that indicates the data has been deleted.
The account that is removed will also be deleted in the PBX.
Note: Any modifications made here will also be reflected in the PBX.
# Call Queues
A call queue (formally known as Agent Group), also known as automatic call distribution (ACD), is an account that routes incoming calls to a specific group of agents. Before connecting to an agent, callers are placed inside a queue, allowing agents to deal with incoming calls without losing other callers to busy signals or unanswered phones. While waiting, callers hear music and pre-recorded announcements. Call queues can be monitored using several monitoring methods.
Call queues are often found in offices that handle high-volume customer calls from callers who do not need to speak with a specific person but who require assistance from any of multiple people, like sales representatives and or support staff. Call queues have a wide range of features.
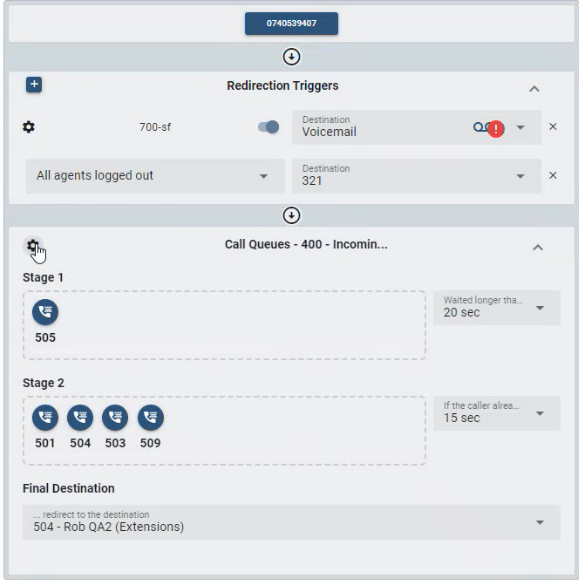
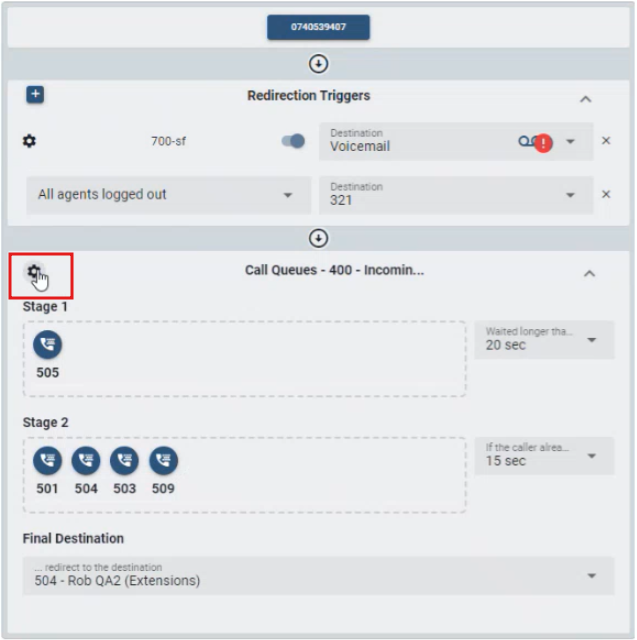
# Call Queues Basic View
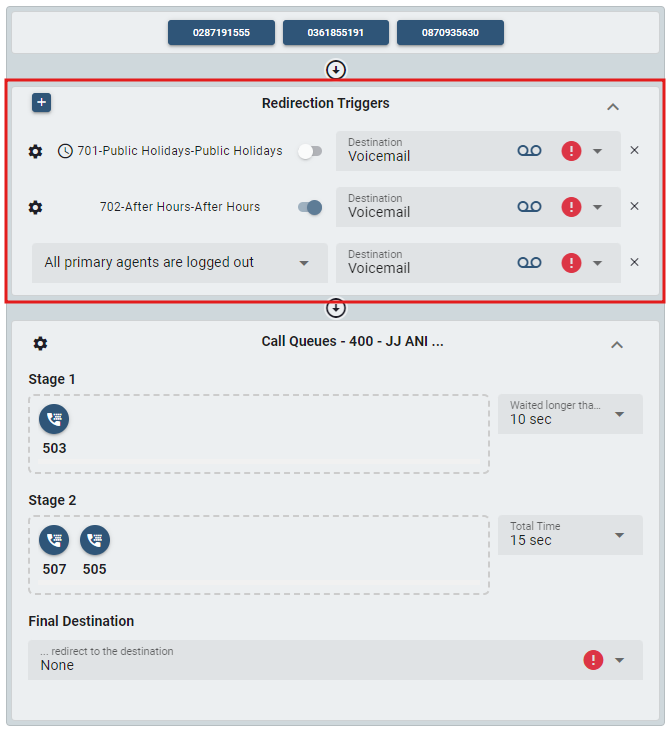
In a Call Queue account, incoming calls are subsequently directed to a designated group of agents. These agents are organized into pools/stages.
- Stage 1 - The primary agents which are always considered for routing incoming calls. The agents in the primary pool are included unconditionally.
- Stage 2 - The agents in this pool are included when the condition for the pool is true. This makes it possible to add additional agents for example when waiting times are getting too long or all of the primary agents are logged out.
- Final Destination - The last resort or the final stage, can be used when none of the extensions picks up a call.
Number of agents added per stage: In every scheduling interval, the system adds only a limited number of agents from its pool of available agents to its list of ringing agents. For large call queues, a typical value would be one or two, as this will ensure that not all agents receive calls at the same time and so that the system CPU is not overtaxed with simultaneous calls.
Ring Stage Duration (secs): At regular intervals, the system checks agent availability and determines whether the next caller should be pulled out of the waiting state. The ring stage duration setting establishes this interval. For larger queues, shorter intervals are recommended, as it is quicker to get callers out of the queue and into a ringback state. The default value for this setting is 5 seconds.
- If the caller waited longer than... - this will call the extensions for the next stage if the caller waited longer than the specified time.
- Total time
Note: Accounts can be added and removed in every stage through drag and drop.
# Configuring Call Queue
- To access the Call Queue Basic Settings, double-click the account under Call Queue in the Call Flow features section or you can also click on the "settings icon" to modify.
- Following that, a new window will pop up to configure the details.
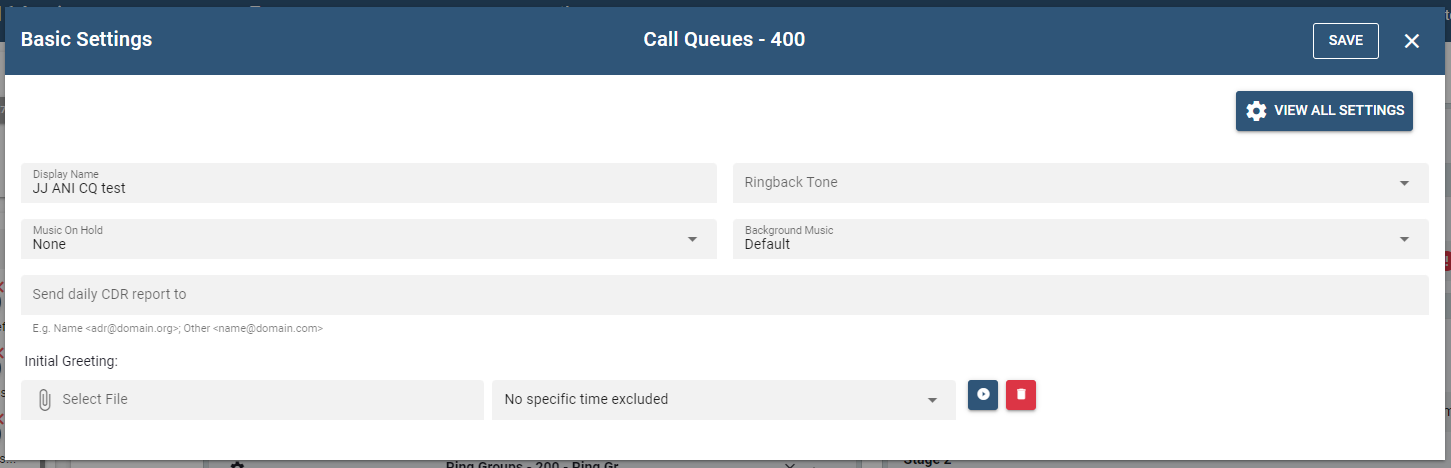
The Basic Settings covers the fundamental and essential configurations that are necessary for the basic operation of an account. It also provides access to shortcuts and the most commonly used features and options. Meanwhile, the Advance Settings offers a wider level of customization and control.
- To access the Advance Setting click on the button.
For detailed instructions on setting up both the basic and advanced configurations of call queues, please refer to the Configuring Call Queue section.
# Ring Groups
A ring group is used to distribute a call to a group of extensions and other account types. In contrast to a call queue, callers are not lined up and are routed immediately instead.
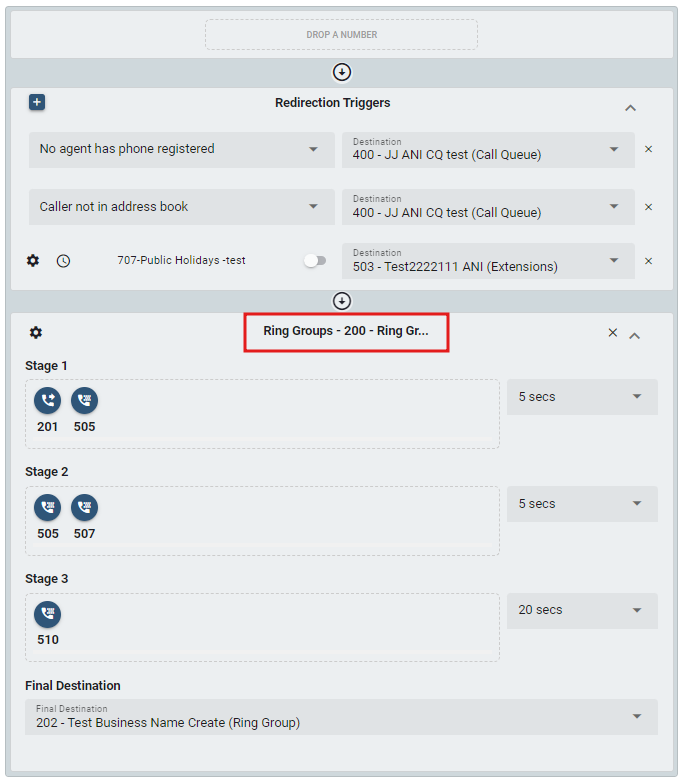
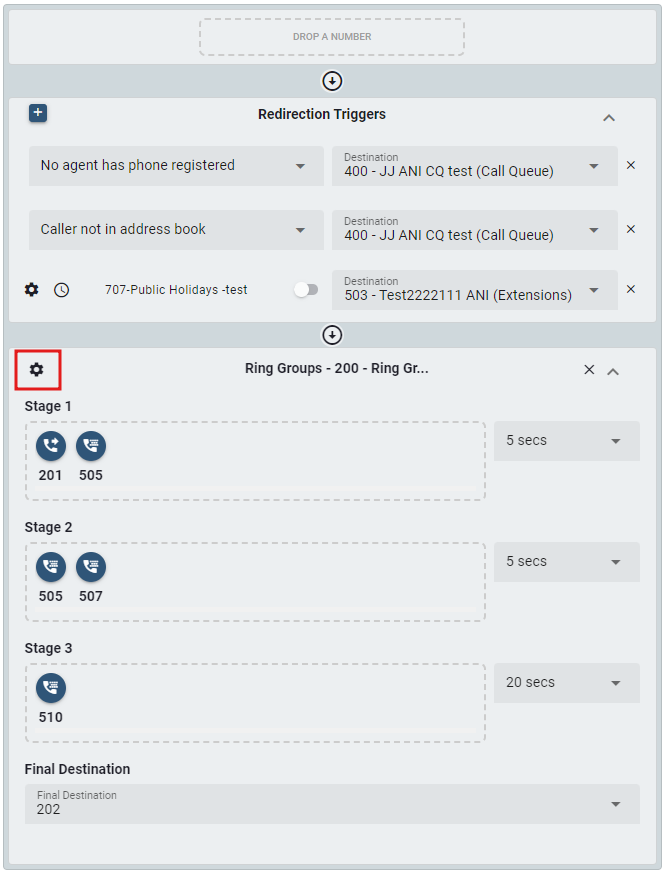
# Ring Groups Basic View
The extension numbers that are part of a ring group can be arranged into groups known as stages. The ring group supports three stages and a final stage. Each stage can be configured to ring for a different number of seconds, and the final stage can be either an internal or external phone number.
For each stage:
- List the extensions or numbers that should be part of that stage. When adding multiple extensions, use the drag-and-drop method (only one number is permitted for the final stage).
- For duration, specify the length of time that the system should ring at each stage before ringing the next. The duration of the stages is specified in seconds.
- For unwanted stages, leave the fields empty.
If all extensions of a stage are unavailable, the system will immediately move to the next stage.
If you check the missed flag for the stage, the PBX will send a missed call indication to the phone when it moves to the next stage and the phone is not part of the next stage.
# Configuring Ring Group
To configure the Ring Groups' Basic Settings, double-click on the accounts under Ring Group in the Callflow Features section or you can also click on the "settings icon" to modify.
Once clicked, a new window will appear to edit the details.
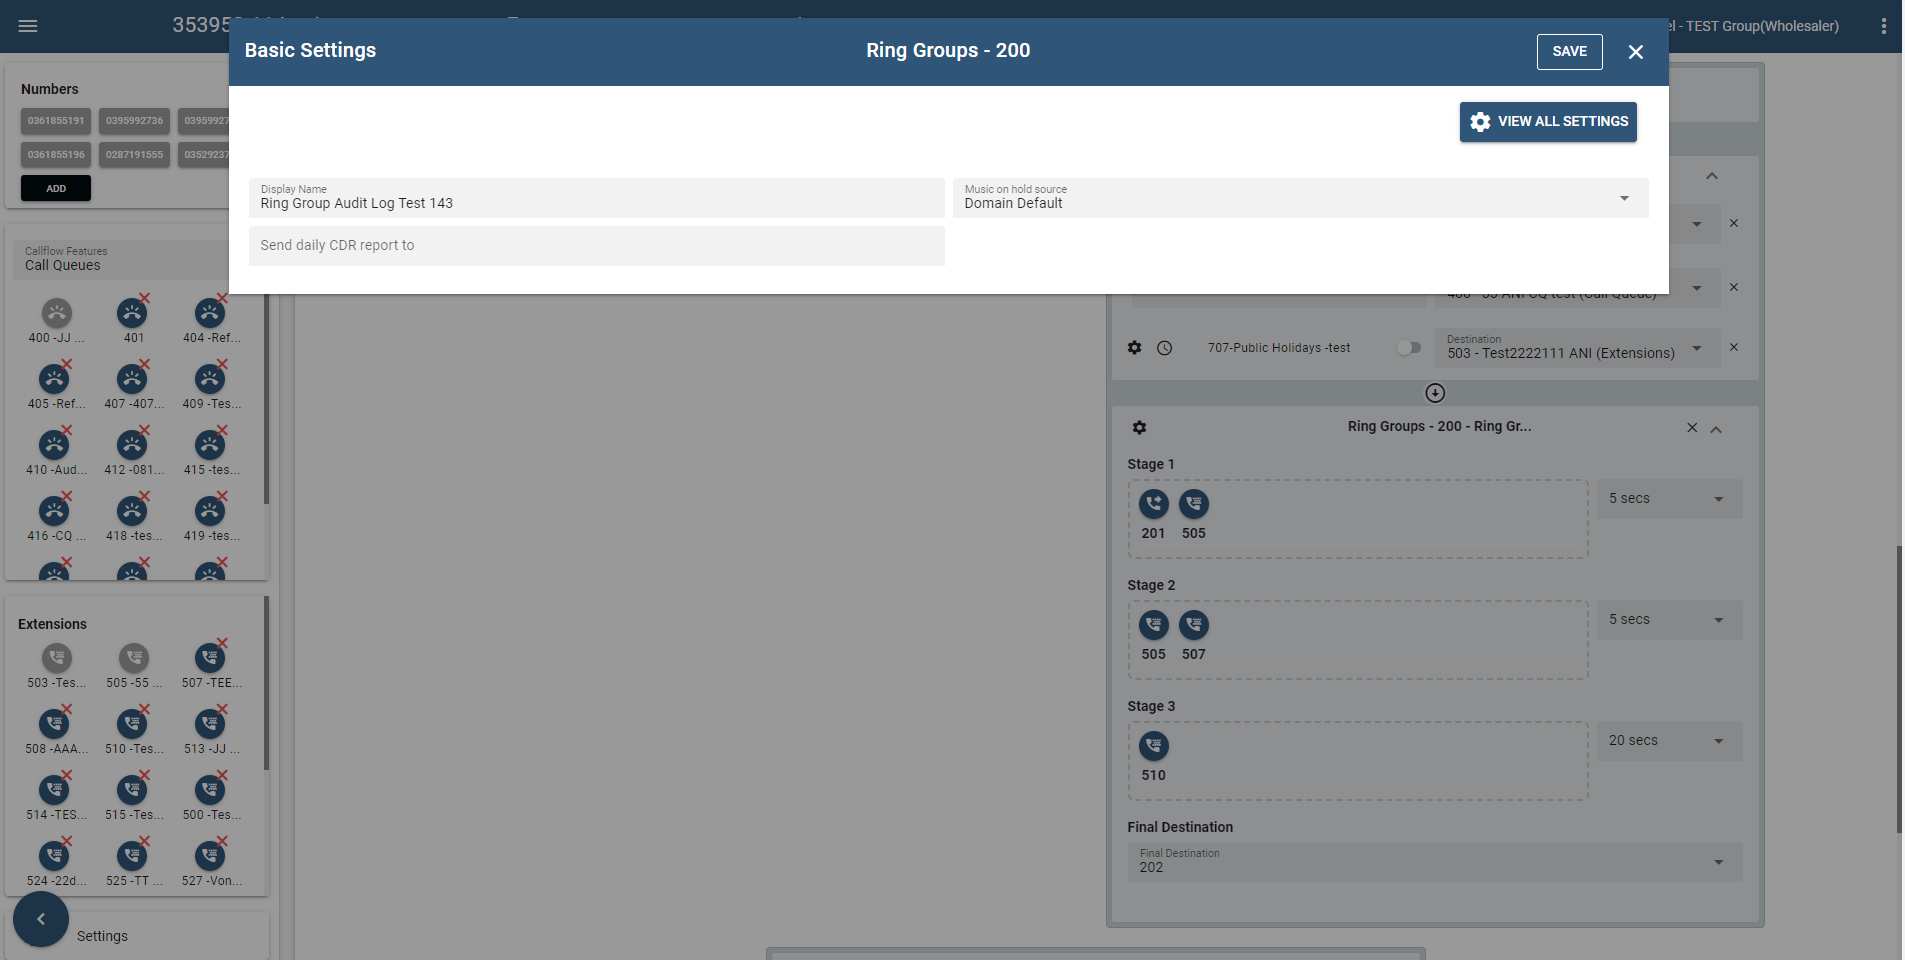
- To access the Advance Settings, click on the button.
For detailed instructions on setting up both the basic and advanced configurations of Ring Group, please refer to the Configuring Ring Group section.
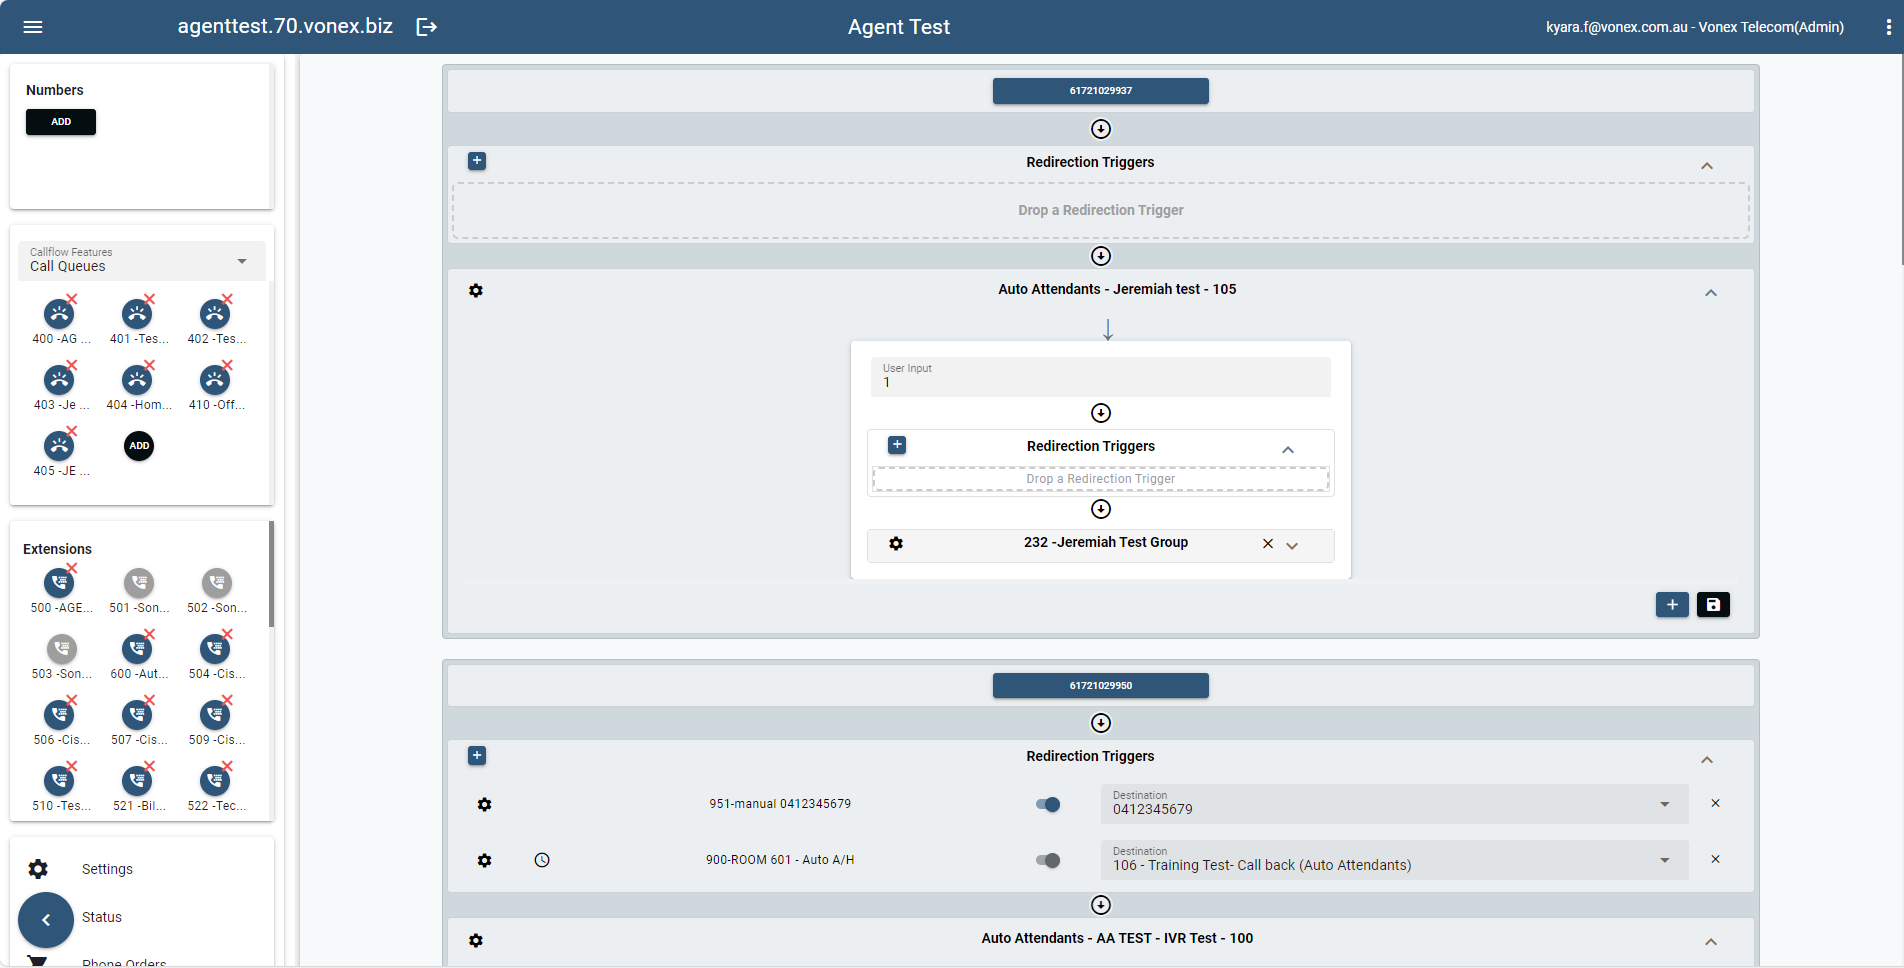
# Auto Attendants
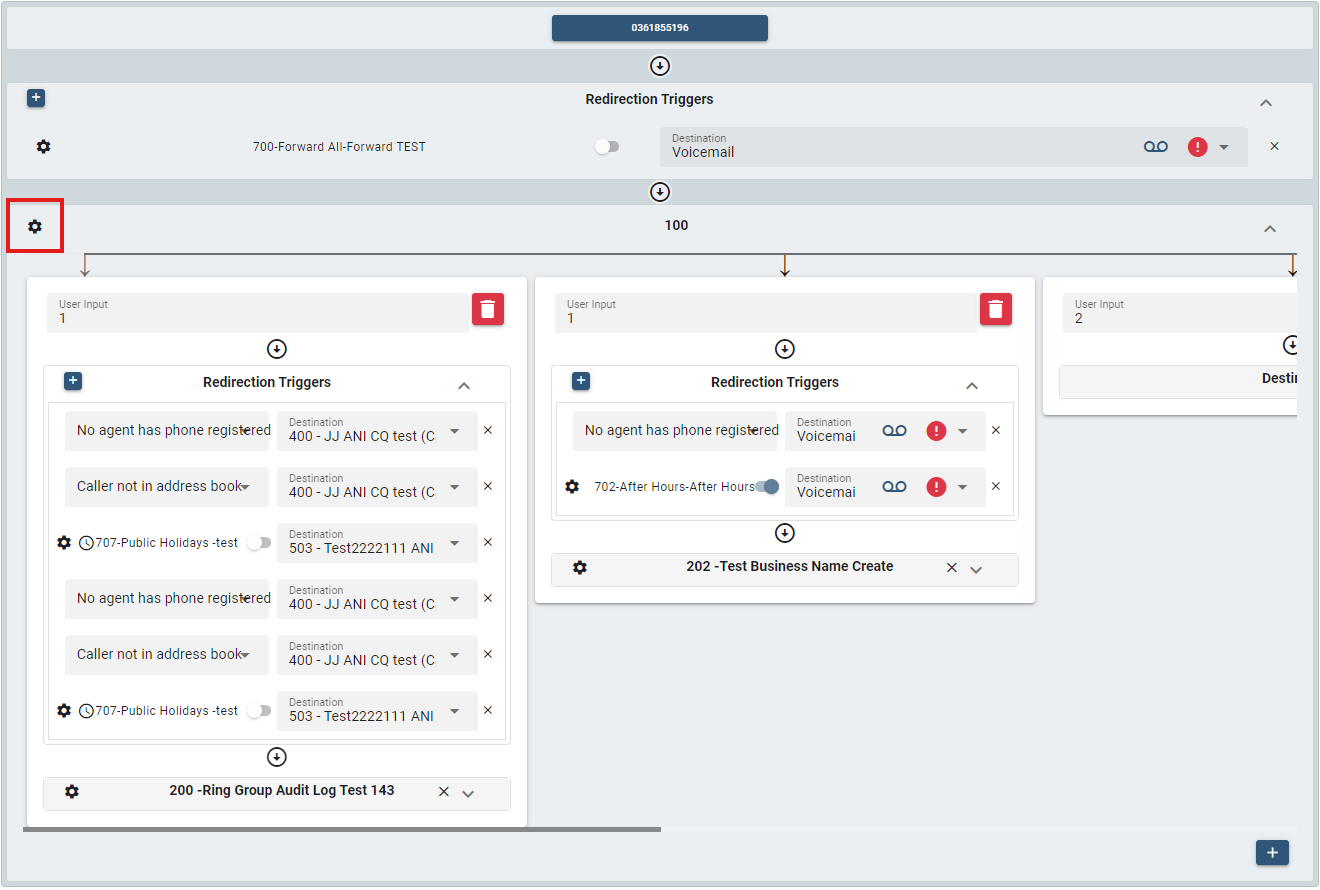
The auto attendant functions like a virtual receptionist, connecting incoming calls to extensions and other devices that have been configured to the system. The auto attendant often announces a company’s name, followed by a selection of dialing options. A typical welcome message might be "Thank you for calling Company ABC, "for Sales, press 1," "for Accounts, press 2," and "for the dial-by-name directory, press 4." Callers press the number that corresponds with their selection and are directed accordingly through User input. In every User Input, it displays the destination account and its corresponding redirection triggers. Any type of destination account can be added to every user input.
# Auto Attendants Basic View
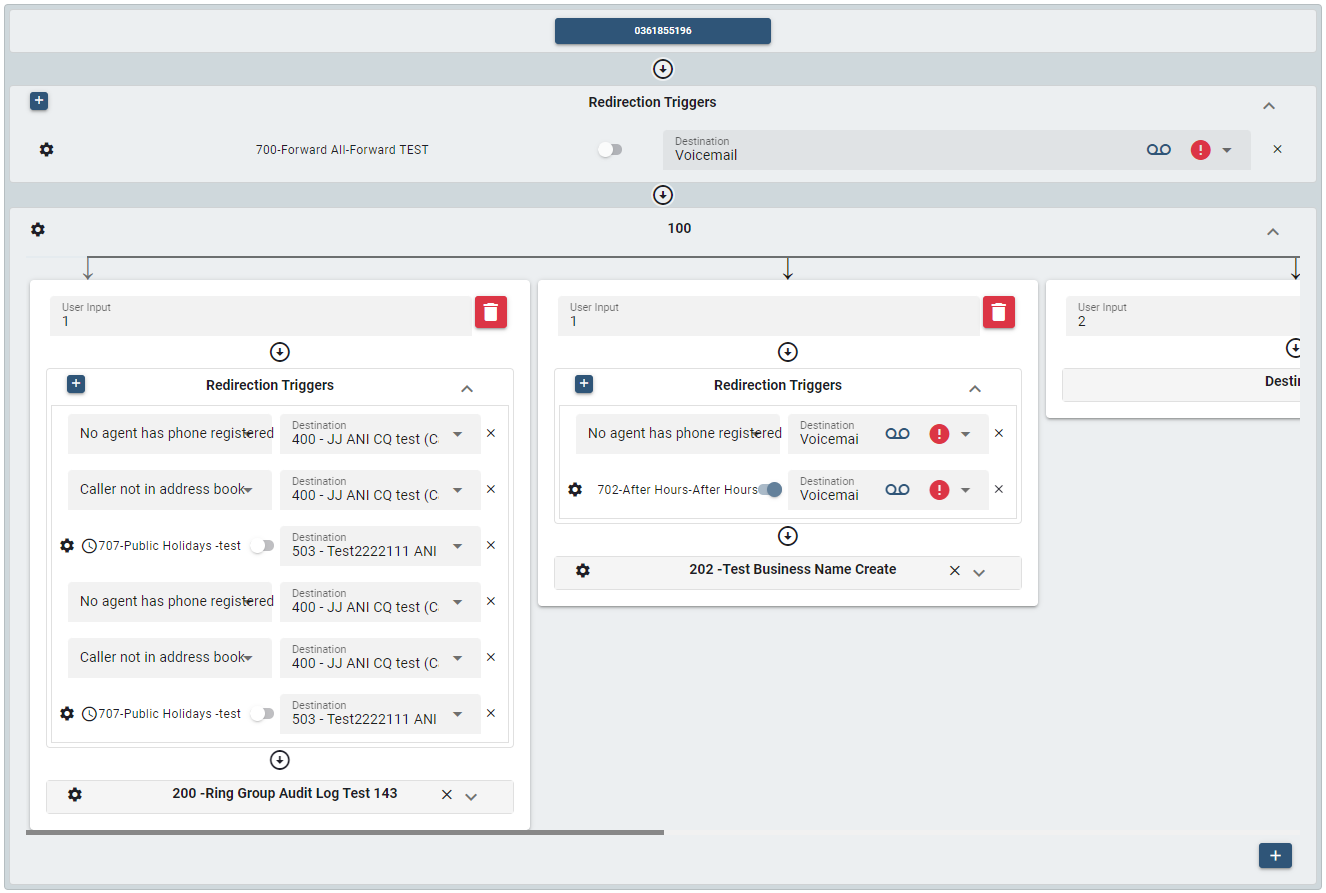
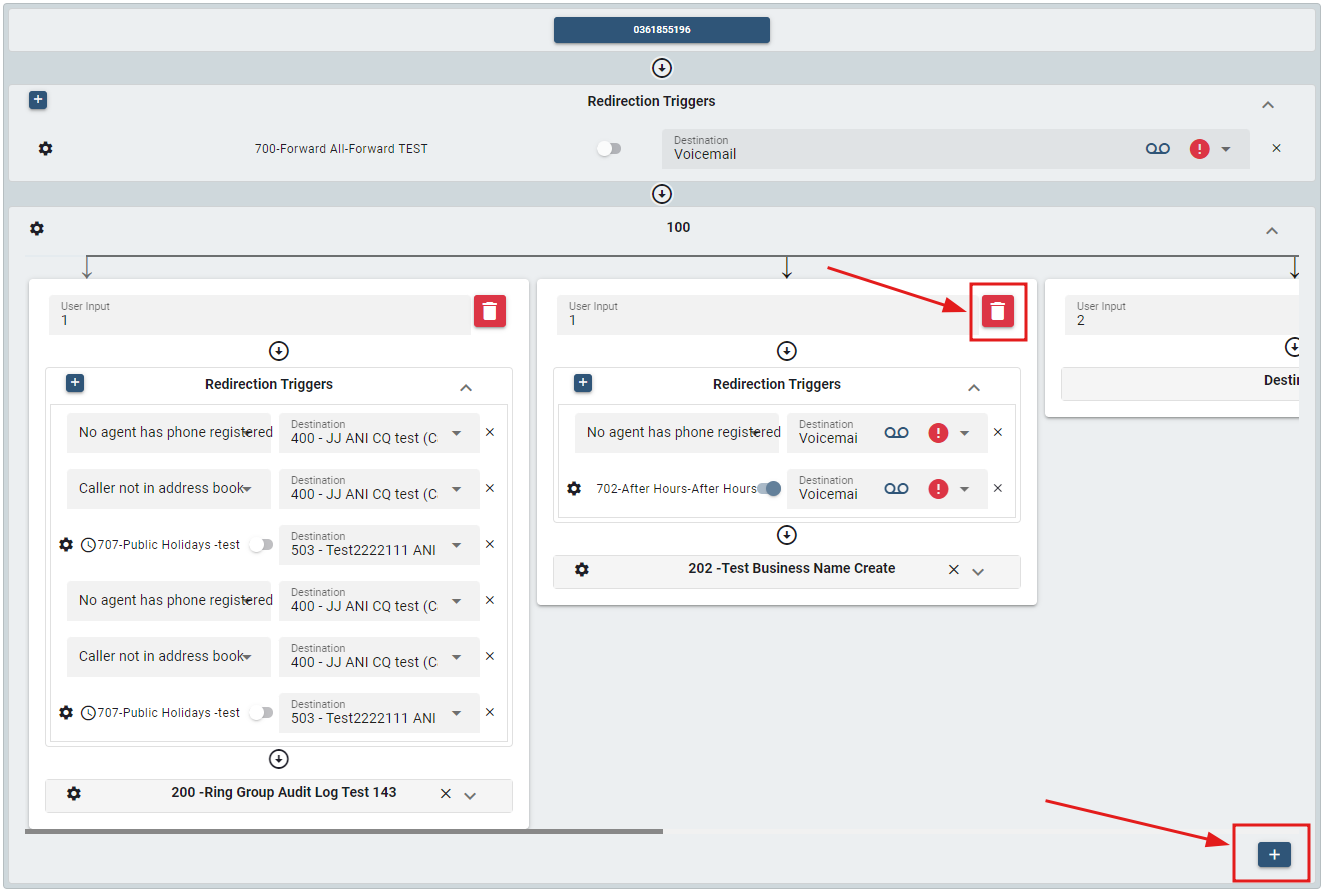
Adding a User Input is possible by clicking the "add icon" and removing it can be done by clicking the "delete icon".
# Configuring Auto Attendant
To configure the Auto Attendant's Basic and Advance Setting, double-click any account under Auto Attendants in the Callflow Features section or you can also click on the "settings icon" to modify.
The Basic Settings covers the fundamental and essential configurations that are necessary for the basic operation of an account. It also provides access to shortcuts and the most commonly used features and options. Meanwhile, the Advance Settings offers a wider level of customization and control.
For detailed instructions on setting up both the basic and advanced configurations of auto attendant please refer to the Configuring an Auto Attendant section.
# Redirection Triggers
There are many places in the PBX where binary decisions have to be made. Redirection Triggers are used to make those decisions. A typical redirection trigger would be on during office hours and off outside office hours.
Redirection Triggers can be time-based or manual. When time-based, the system automatically changes its state depending on the times that were set up. Users can still override those states with manual interactions. Manual redirection triggers change their state only when a user explicitly changes it.
Examples of using redirection triggers include:
- Routing calls outside of business hours to a mailbox
- Determining when to call users on apps
- Adding agents to call queues during peak hours
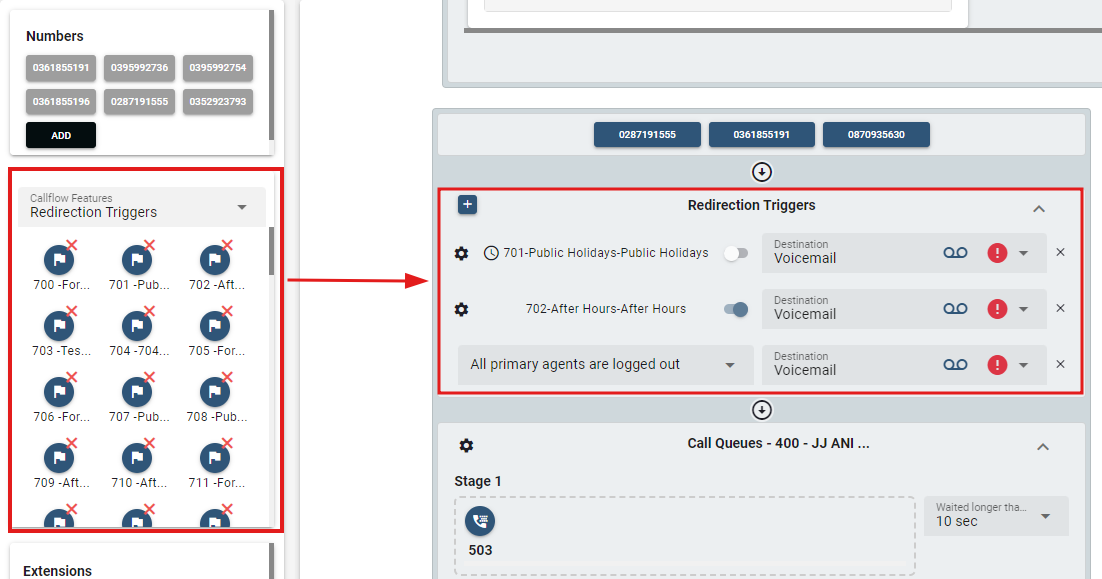
Redirection Trigger is displayed in the second section of every call flow. This shows the redirection triggers for every account selected.
An additional redirection trigger can also be incorporated using the drag-and-drop functionality from the Callflow Features section to the selected account and can be removed by moving it back to the accounts section.
Additionally, another way to remove a redirection trigger is also done by clicking the "x" icon.
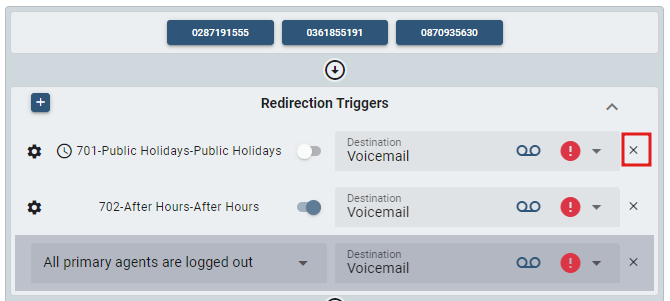
To configure a redirection trigger, double-click on the account or you can also click on the ""settings icon"" to modify.
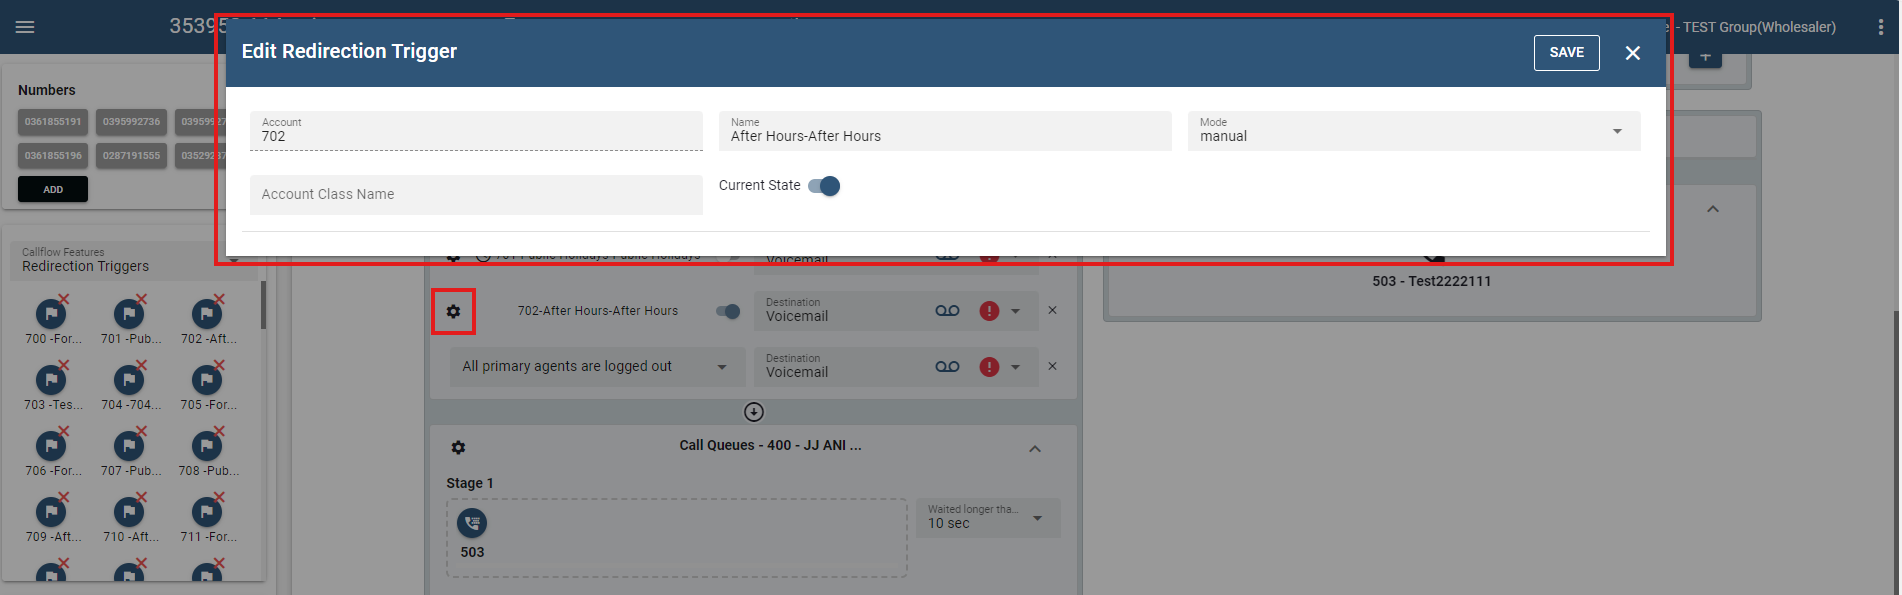
For detailed instructions on setting up redirection trigger, please refer to the Configuring Redirection Trigger section.
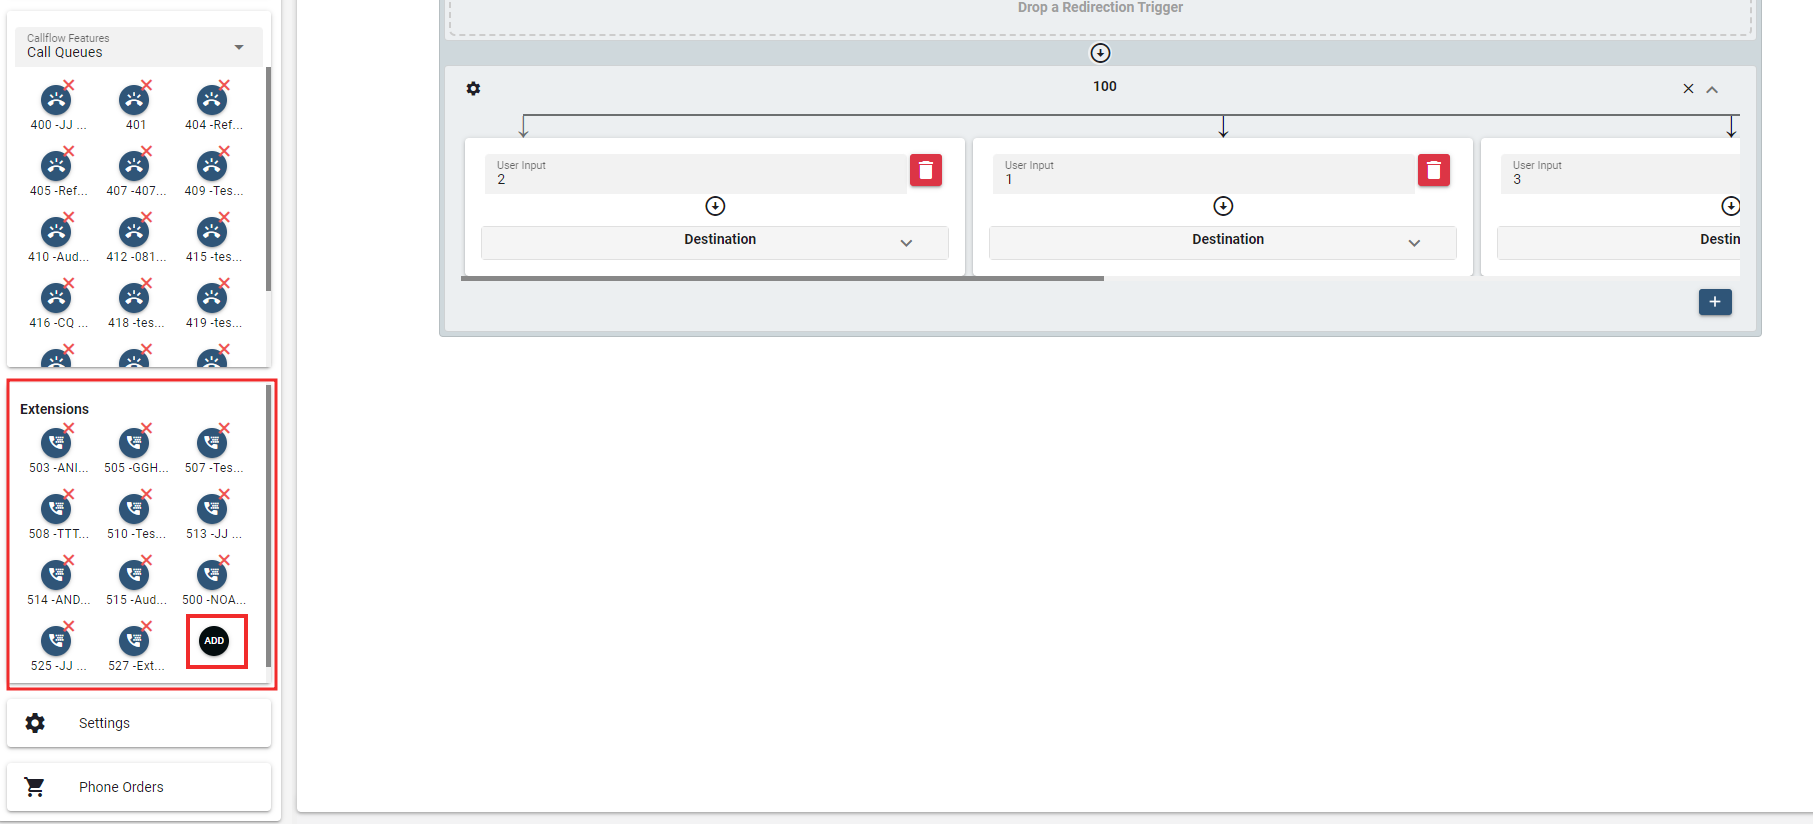
# Extensions
Extensions are essentially the phone numbers allocated to the phones connected to the PBX, which are the extensions of the PBX. That is how one phone in the PBX can call another and how external calls can be directed to a particular extension, etc. Extensions have a wide selection of settings.
# Creating Extension
To create new extension on the Call Flow page, click the button under the Extensions section.
Populate the fields for each of the extensions, using the information shown below: .
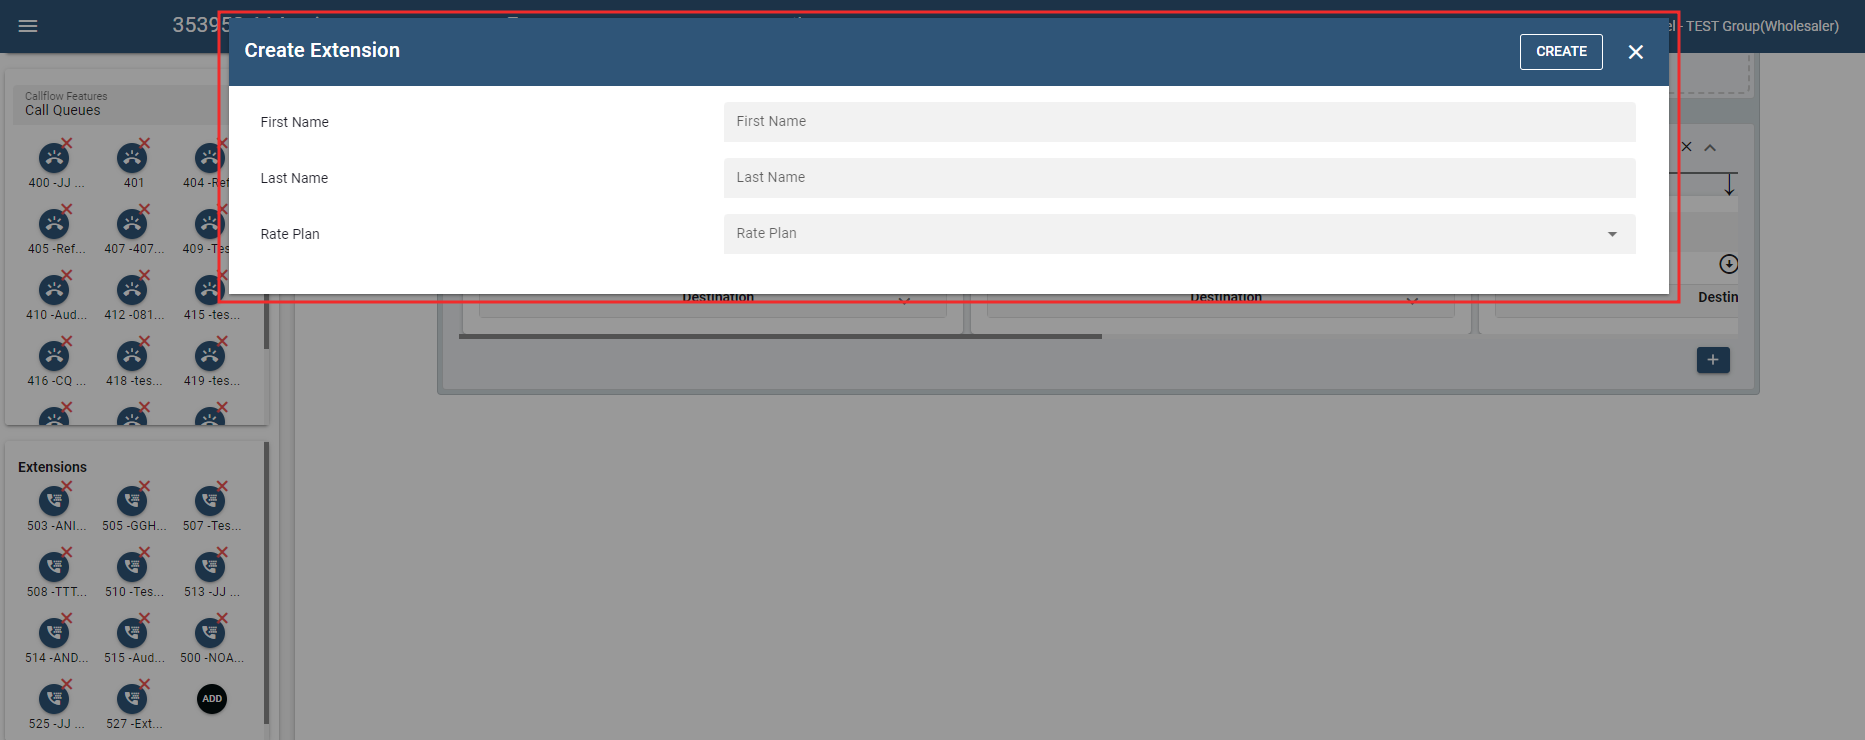
- First Name, Last Name: The First name and Last name fields will be displayed for all internal and external calls (international characters are permitted).
- Rate Plan: A rate plan is a plan that is tied down to a specific extension.
Details can be changed later on after the extension(s) have been created.
Once done, click .
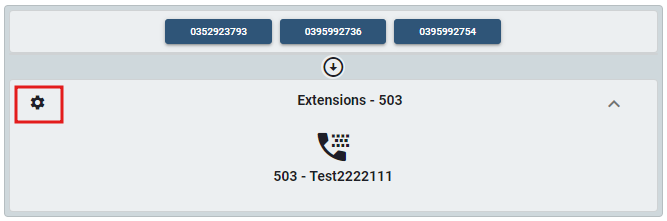
# Extensions Basic View
This area comprises only two sections: the Number and the destination account. Configuration options are only limited to basic and advanced settings.
# Configuring Extension
To configure the Extensions setting, double-click the account under Extensions section or you can also click on the "settings icon" to modify.
Following that, a new window will pop-up to configure the details.
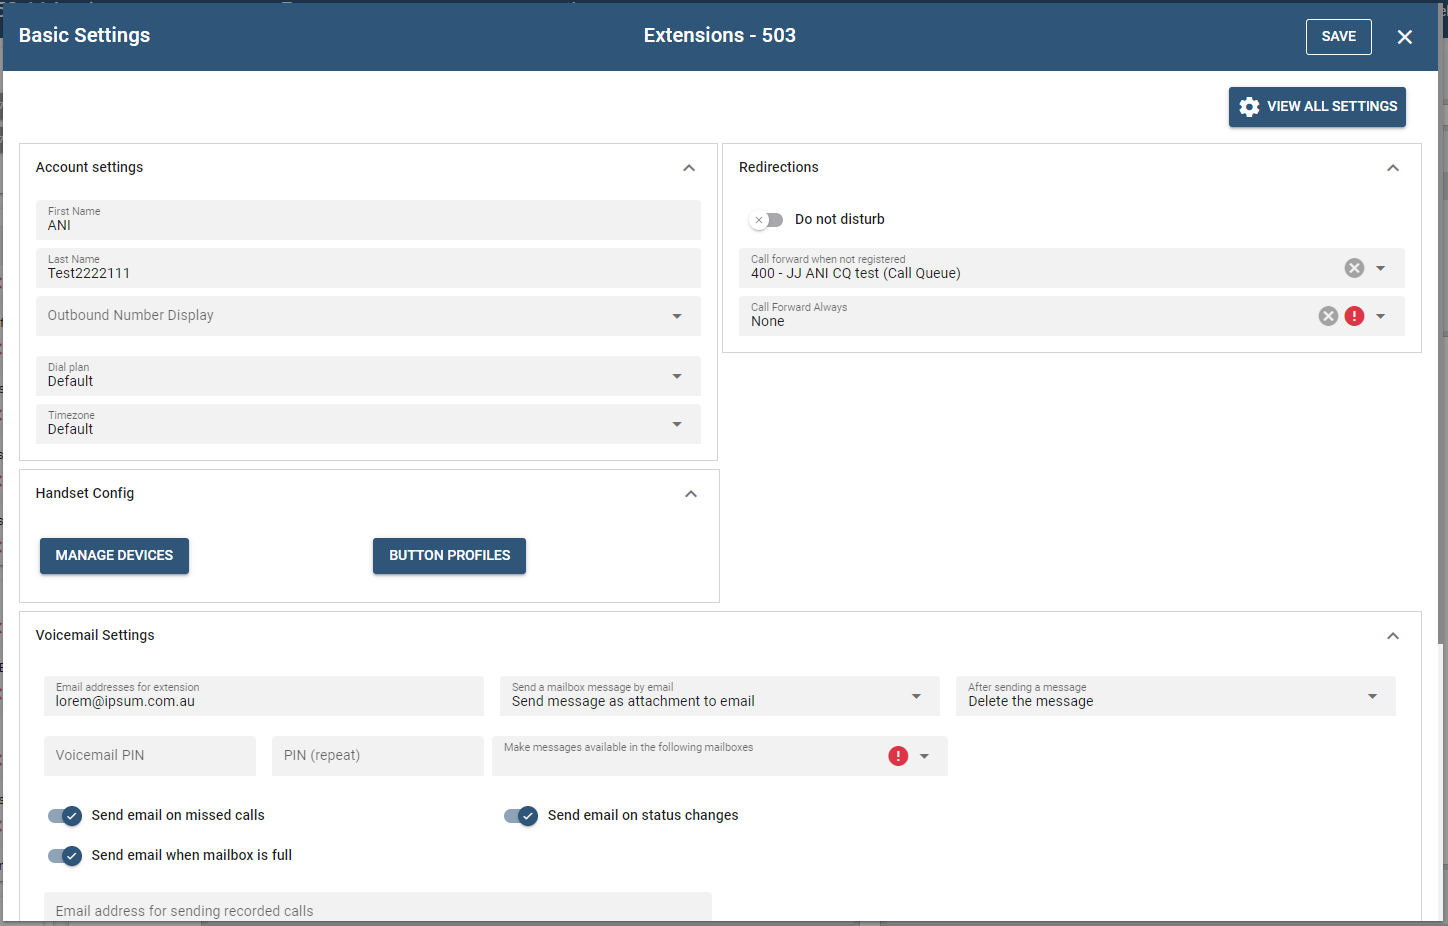
The Basic Settings covers the fundamental and essential configurations that are necessary for the basic operation of an account. It also provides access to shortcuts and the most used features and options. Meanwhile, the Advance Settings offers a wider level of customization and control.
To access the Advance Setting click on the button.
For more detailed information on setting up both the basic and advanced configurations of extensions, refer to the documentation on Configuring an Extension.
# Settings
# General Settings
This page can be used to define settings that affect all accounts.
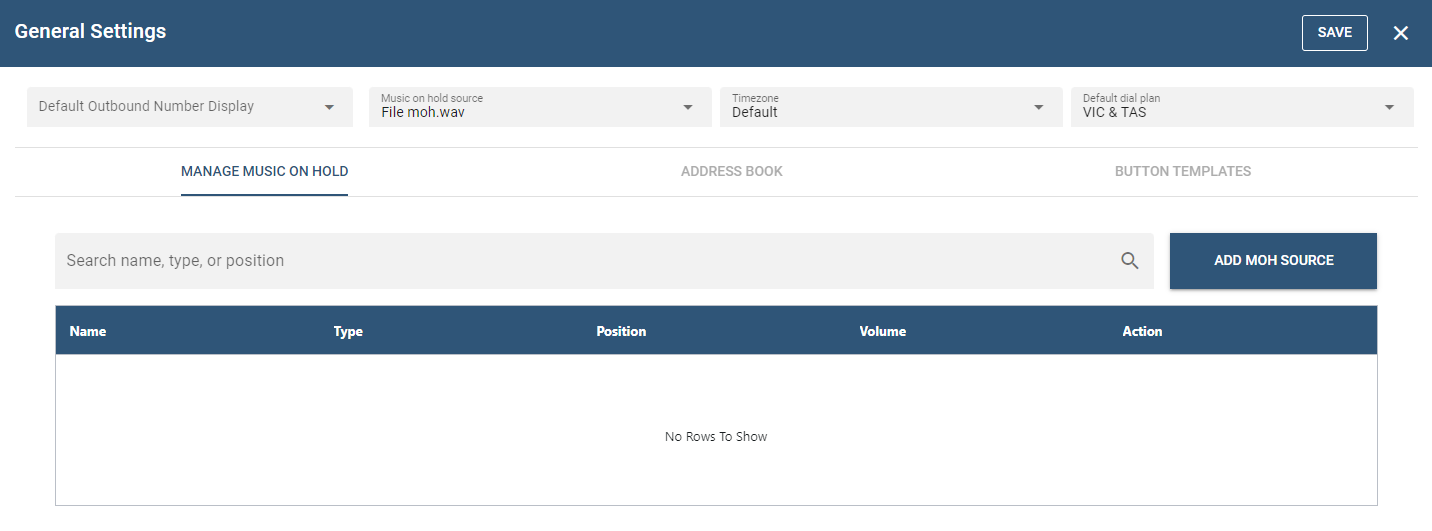
- Default Outbound Number Display
- Music on hold source- Select the source of music that will be used when a call is put on hold. The party who is on hold hears the music that is chosen here.
- Timezone - The system can handle multiple time zones simultaneously, making it possible for users to select a time zone that corresponds with their geographic location. This setting influences the time on mailbox messages and the telephone display. Before the system can apply the time zone to the user's extension, it needs a time zone configuration file (timezones.xml). The name of the time zones is reflected in the lang_xx.xml file, where xx is replaced by the respective language.
- Default dial plan - This dial plan will be used by the domain, but users can override this with their own dial plan based on need. Most of the accounts in a domain will use the default dial plan. Problems with placing outbound calls will most likely happen if the default dial plan is not set. Therefore, it is strongly recommended to choose a default dial plan.
Please refer to the General Settings section for more information.
# Manage Music On Hold
This section contains the complete list of Music on Hold sources for an account. The option to create, modify, or remove music on hold files, as well as control user interaction during playback are also available.
Please refer to the Music On Hold section for more information.
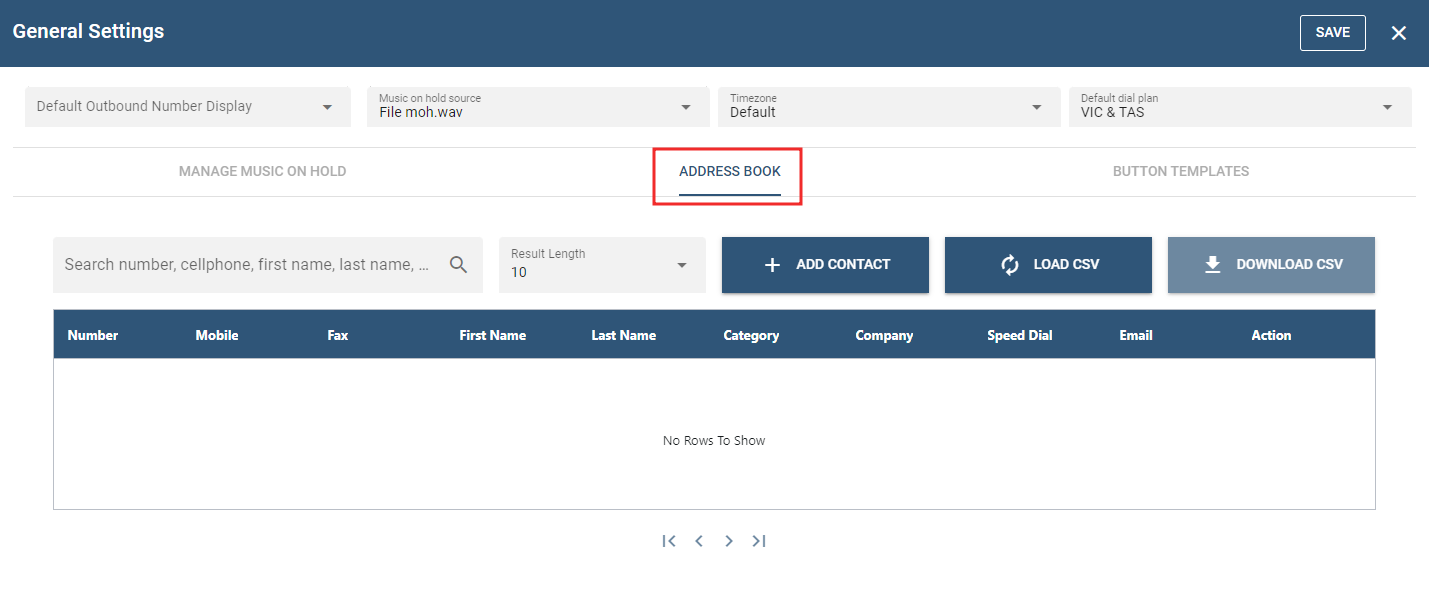
# Address Book
This list shows the shared address book. It is visible to all extensions. Please be careful when setting speed dial numbers. Use the asterisk sign in front of the number and be sure that you don't overlap a star code. Please be careful clicking the delete button, because the entry will be permanently deleted.
Please refer to the Address Book section for more information.
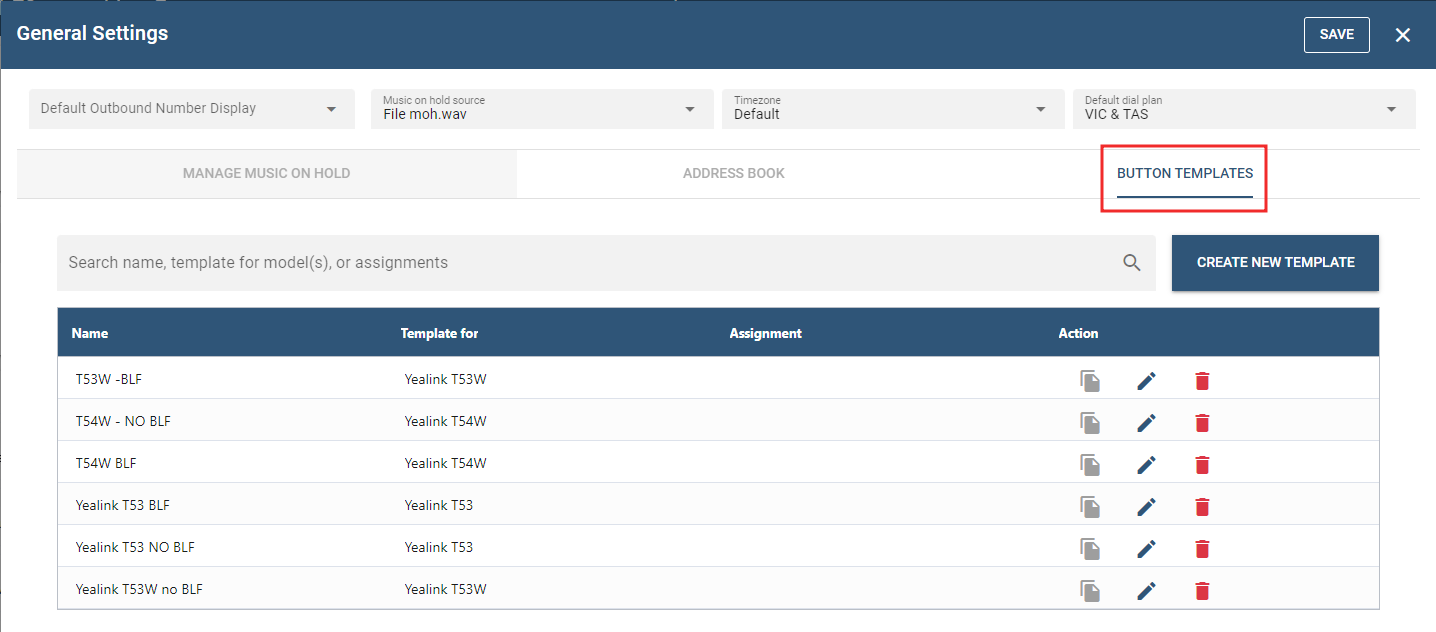
# Button Templates
Please edit your button templates here. Those templates define what the buttons on automatically provisioned VoIP phones will do when the user pushes them. You can use them when setting up buttons for extensions, where you can override the template for some or all buttons. Templates that were set up as the default templates for a model are marked with an asterisk (*).
Please refer to the Button Templates section for more details.
# Status
# Calls & Registrations
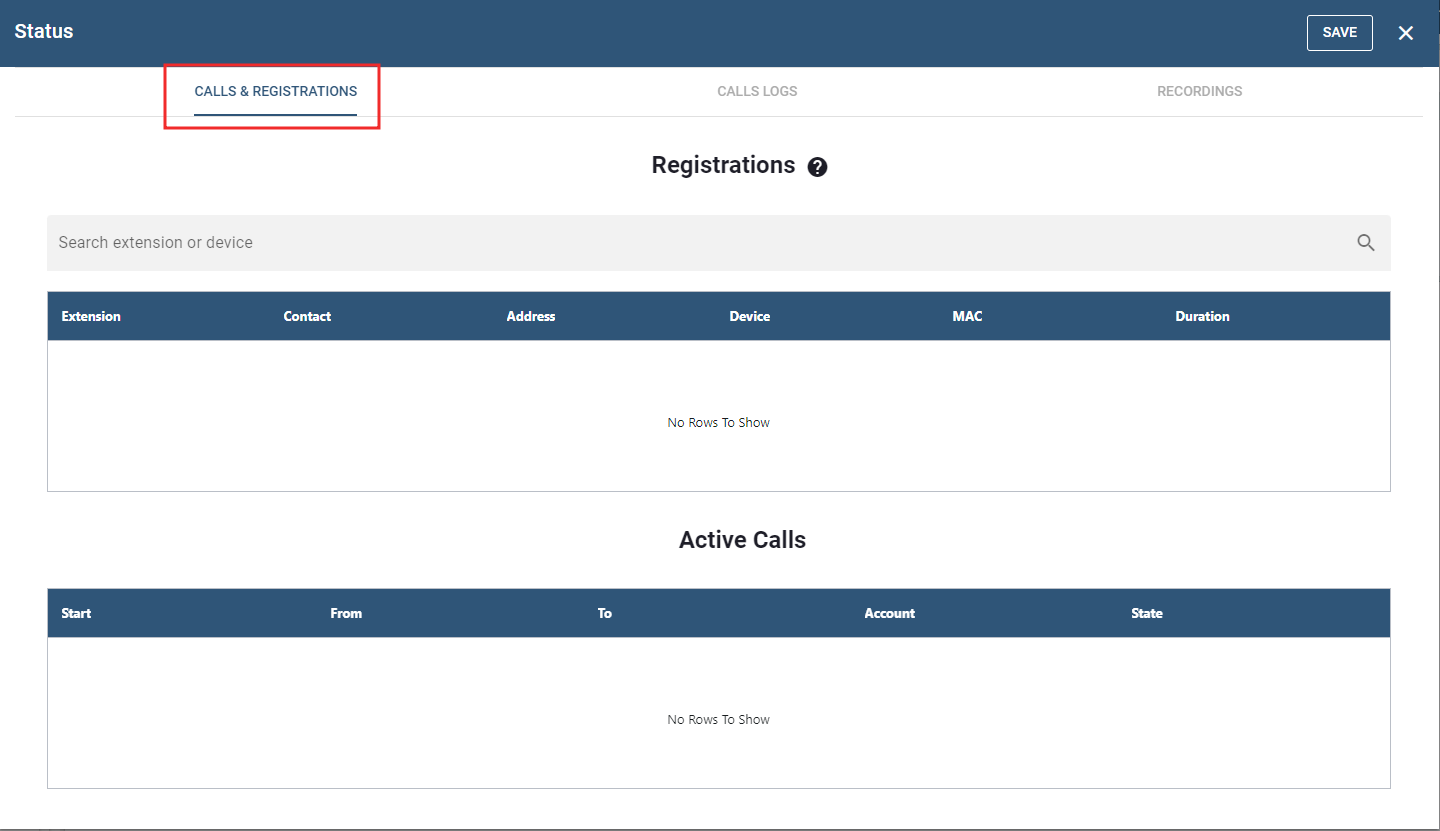
# Registration
The registration tab will inform the administrator of all the registered phone on the system.
Extension: Number of the account Contact: Local contact IP of the SIP device Address: External IP, Devices: Model phone information Duration: Status information on how many hours, seconds
# Active Calls
Active Calls refers to the calls or communications that are currently in progress or ongoing. This section is valuable for monitoring and providing real-time support for ongoing communication sessions
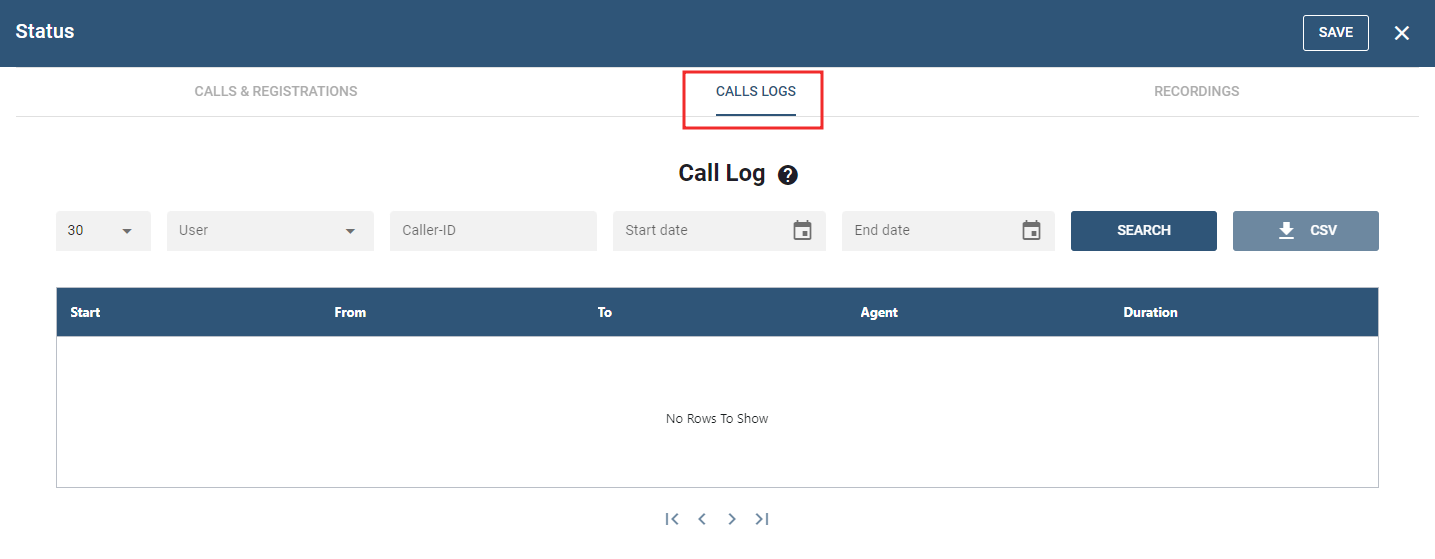
# Calls Logs
This page shows the list of calls from a specific account.
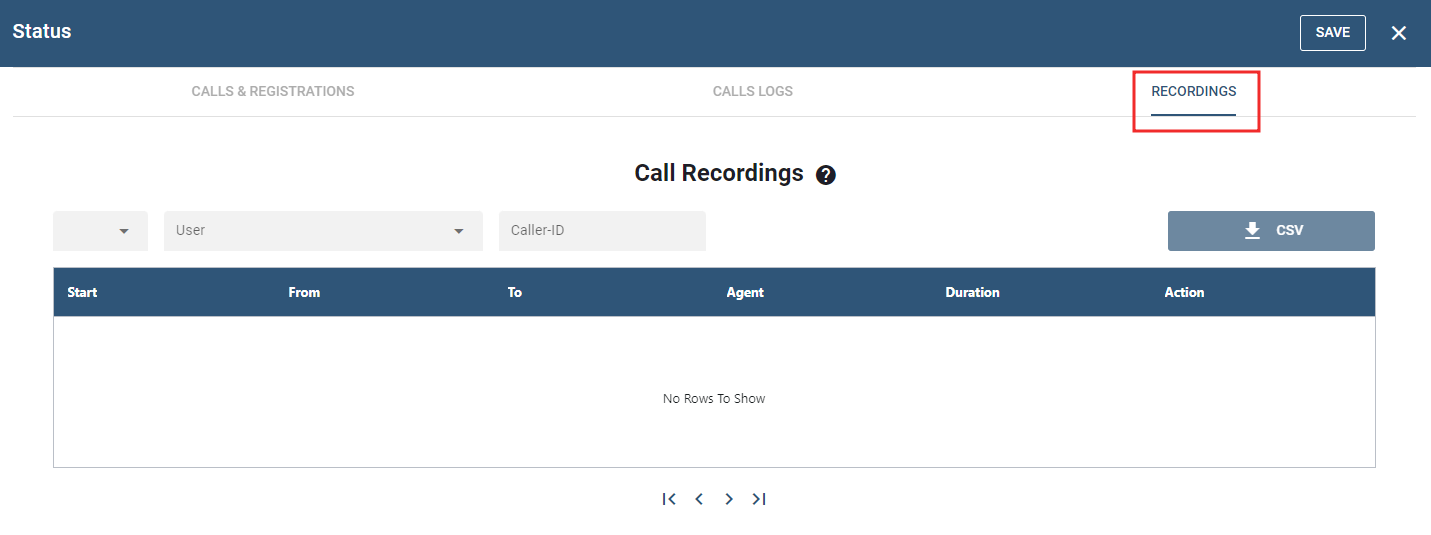
# Recordings
This tab provides the lists of recorded calls which are displayed in the table. All the details regarding the call are documented. This includes the duration of the call, the time at which it started and ended, the agent, and the action taken.
NOTE: Once any changes are made in the Settings tab, please click the button to confirm and process the updates.
# Phone Orders
This page shows the list of phone orders which record the order details in the table.
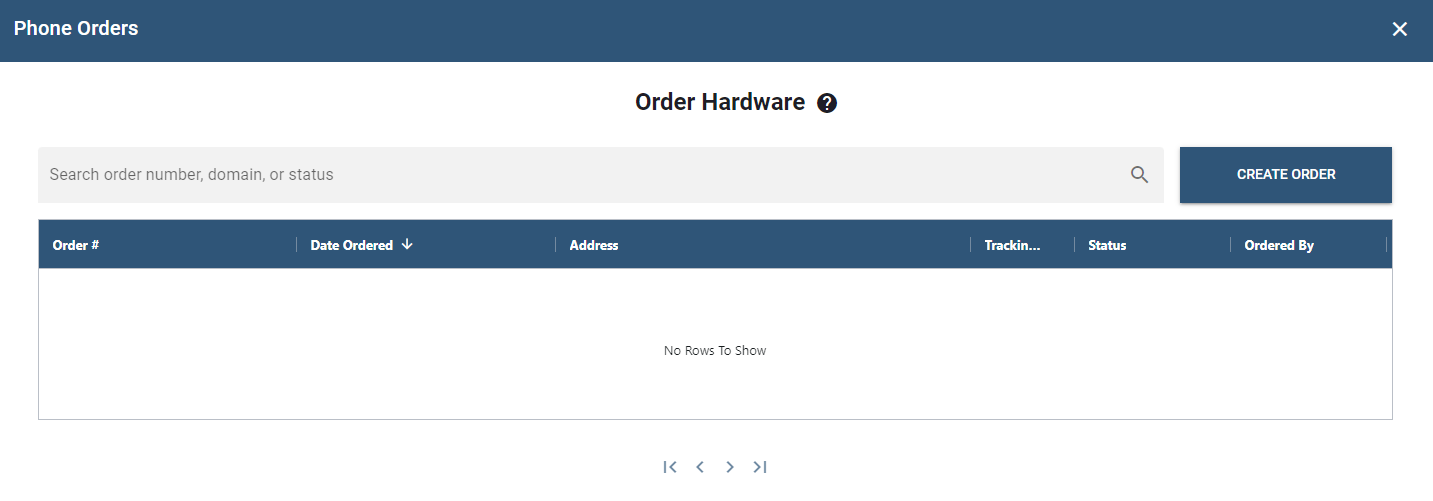
- Order #- serves as a unique identifier for each phone order. It's a crucial component of the table as it allows for easy reference and tracking of specific orders.
- Date Ordered - records the date when the order was placed.
- Address - the delivery address provided by the customer when placing the order.
- Tracking
- Status - reflects the current state of the order.
- Ordered by - the person who placed the order.
To immediately look/ track the order, search the order number, domain, or status in the search field.
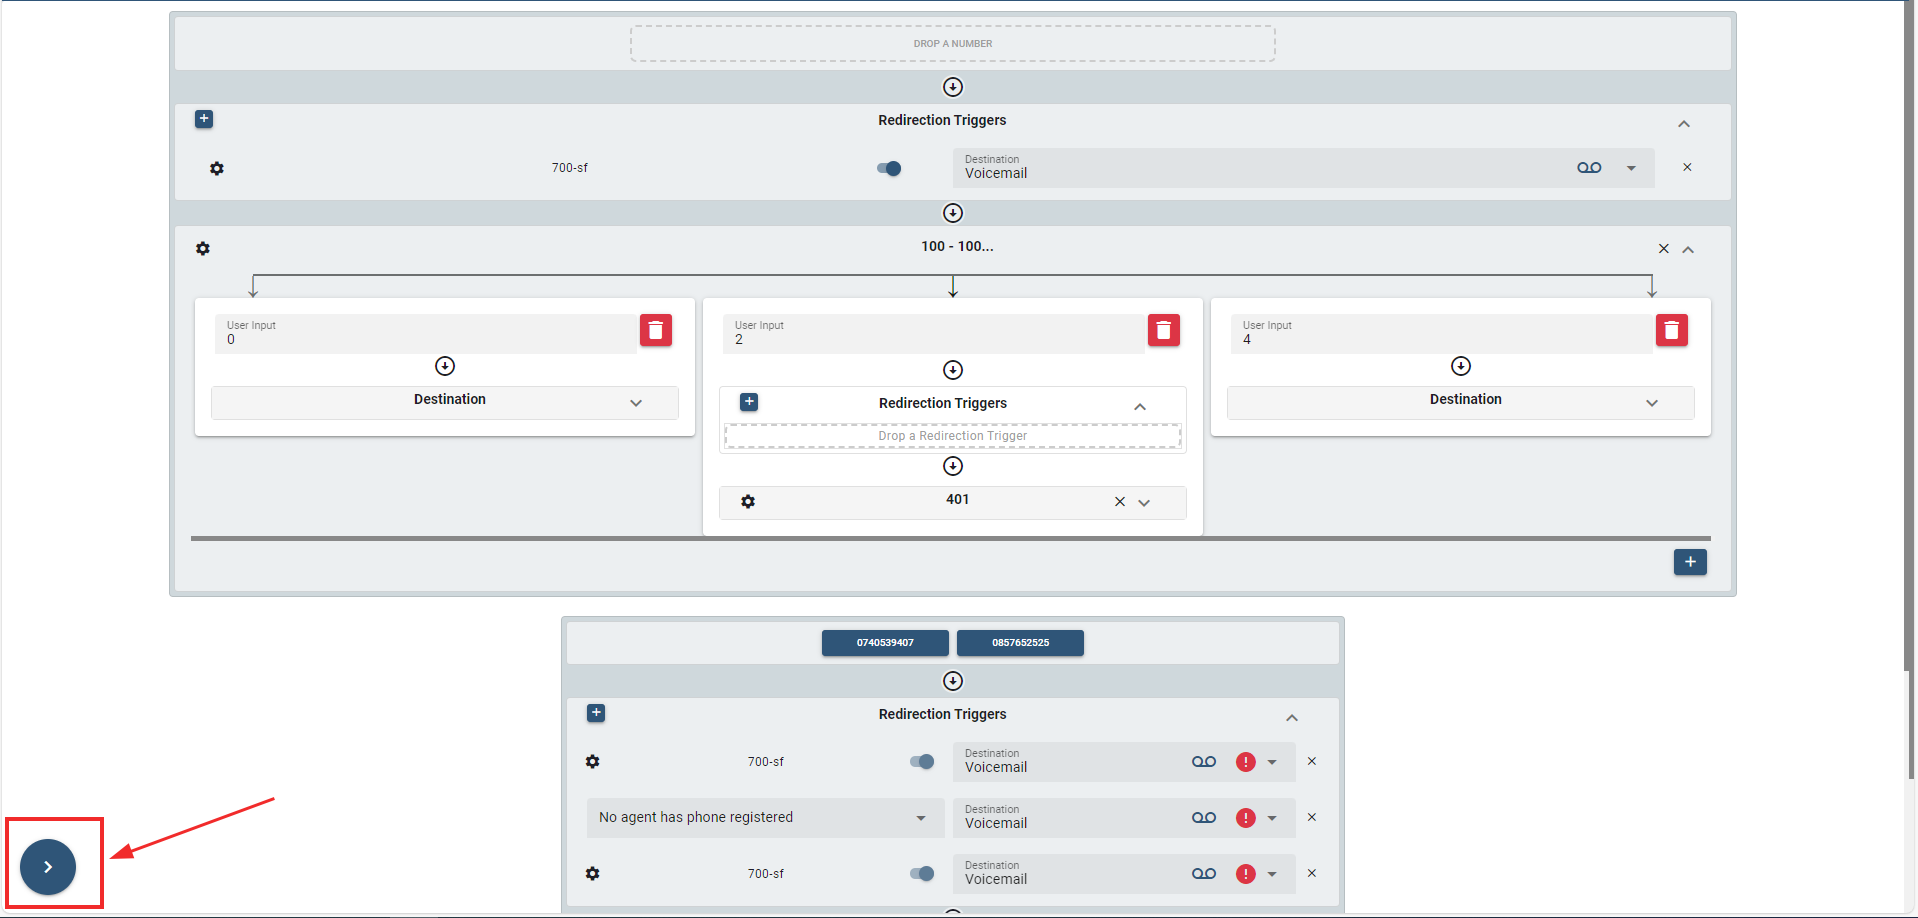
These symbols are user interfaces to provide a collapsible sidebar and an expandable canvas, creating a dynamic layout that allows users to control their viewing experience.
(Collapse sections and Expand Canvas)
Clicking this symbol allows the user to collapse/hide sections of the sidebar and expand the canvas. By collapsing sections, the user can hide less relevant information, making the main content more prominent and have a more comprehensive view.
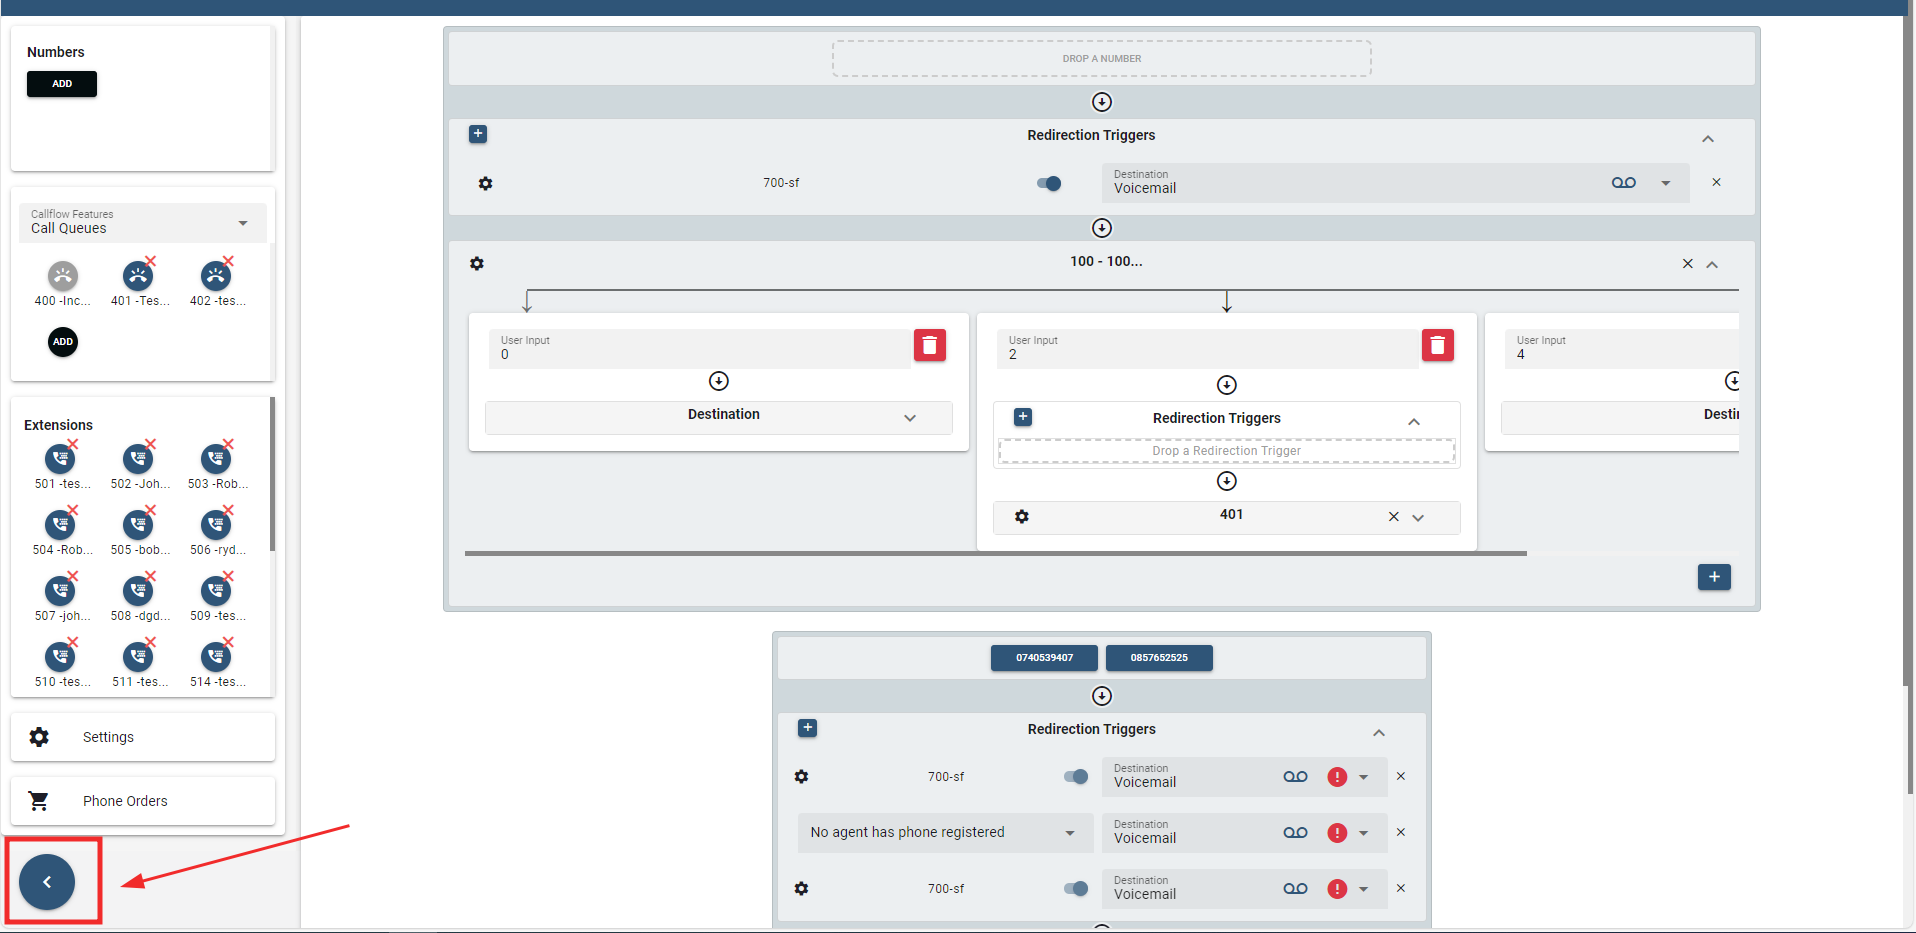
(Reveal Sections on the sidebar)
On the other hand, clicking the ">" symbol, allows the user to reveal the sidebar sections